So, you want to create a pricing table and add that to your WordPress website?
A good pricing table can help you make or break a conversion. It gives your customers a visual look at the different products/services you are offering and the differences between them – both in terms of price and functionality.
As such, a well-made pricing table is an awesome tool to help you increase your conversion rate and boost sales figures. With this in mind, we have put together an in-depth guide on how to create a pricing table in WordPress.
Now, WordPress doesn’t offer any default capabilities for adding pricing tables. Which is why, we will be using one of the best WordPress pricing table plugins – Pricing Table by Supsystic to help us out.
What is the Pricing Table by Supsystic WordPress Plugin?
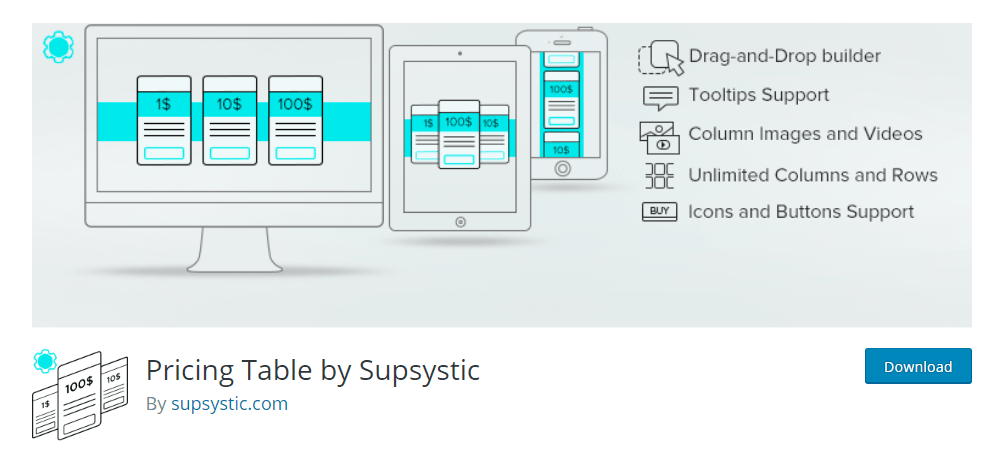
Pricing Table by Supsystic is a free plugin that can help us create a pricing table in our WordPress websites. It gives us access to tons of features and functionalities to help us create highly customizable pricing tables.
Here is a look at some of the key features the plugin brings to the table:
- Option to create unlimited pricing tables.
- Add unlimited columns and rows to your pricing tables.
- Comes with ready to use pricing table templates.
- Tons of customization options.
- Drag and drop pricing table builder.
- Responsive mobile-friendly pricing tables.
A paid version of the plugin is also available which packs in many more advanced bells and whistles.
How to Create a Pricing Table in WordPress
Now that you have a basic idea of what is Pricing Table by Supsystic and what it brings to the table, here is an in-depth step by step guide on using the plugin to create a pricing table in WordPress.
Step 1: Installing The Plugin
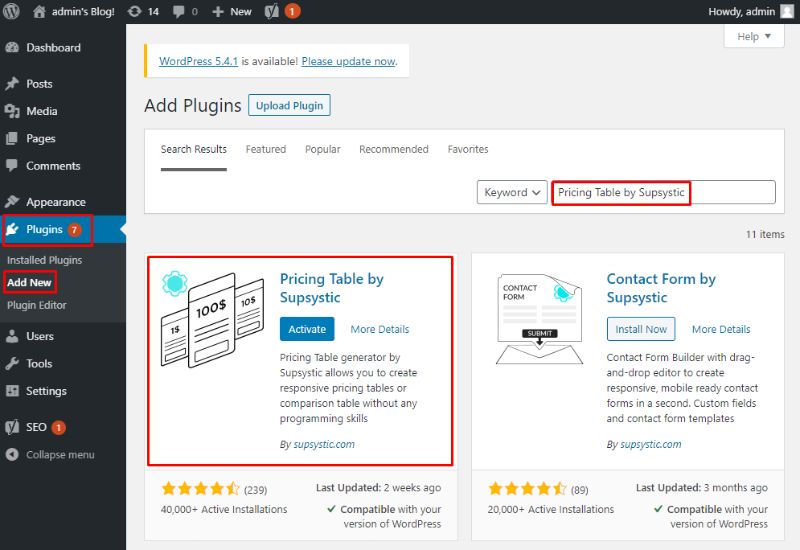
To install the plugin, log in to your WordPress dashboard, navigate to Plugins > Add New from the left-hand sidebar. Now, on the search field, type in Pricing Table by Supsystic and hit enter.
Now, click on Install Now followed by Activate on the plugin shown in the image.
Step 2: Create a Pricing Table
With the plugin installed, you should see a new option – Pricing Table by Supsystic, on the left-hand sidebar. This is where you find all the options to create and customize the pricing tables.
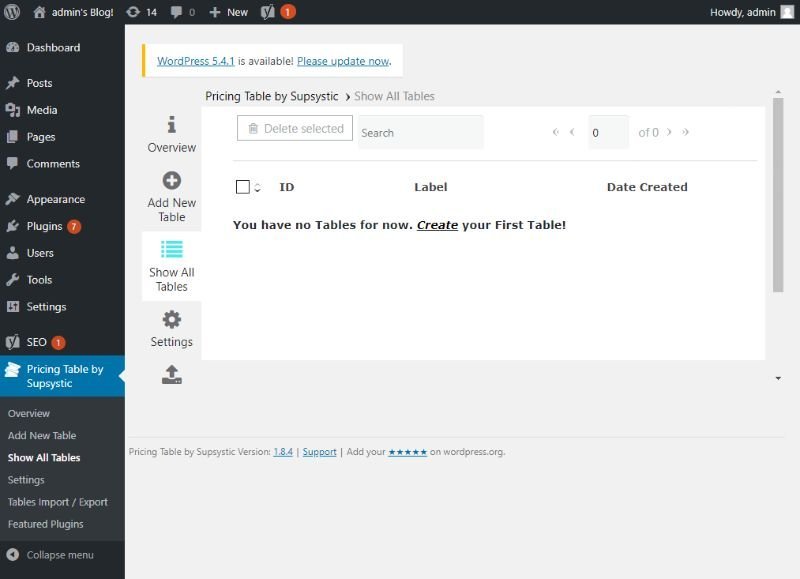
Now, you can either click on the “Create” button or the “Add New Table” button. This will take you to the following page.
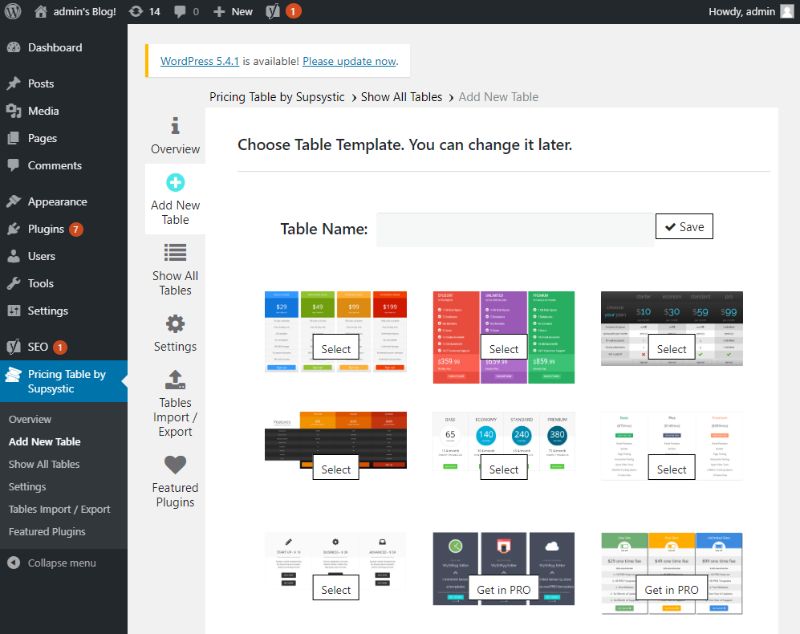
You will first need to enter a name for the pricing table. Next, you will need to select a pricing table template, from the vast list of options.
The free version only has 7 premade templates that you can use. However, upgrading to the Pro version will unlock many more. Now, for the purpose of this tutorial, we will be working with the first template.
Step 3: Customizing the Pricing Table
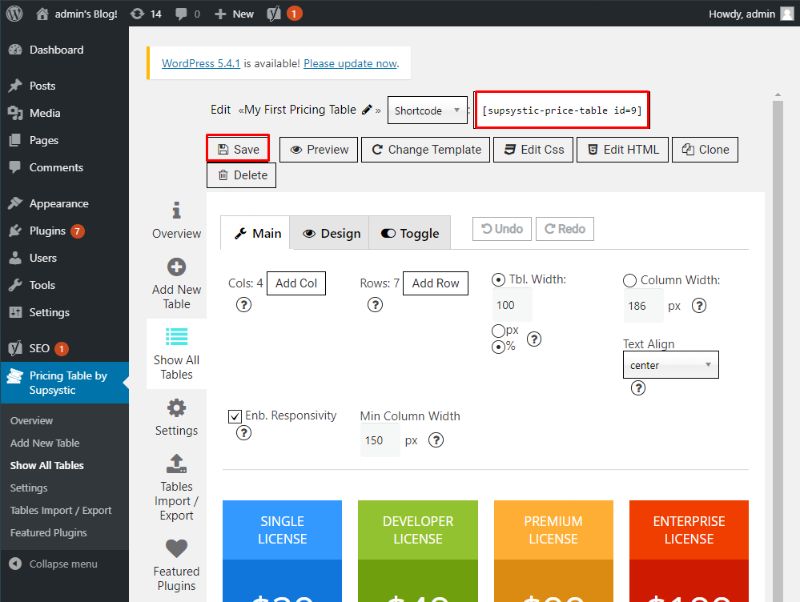
After selecting a template, and giving your pricing table a name, hit Save, and it will take you to the following screen:
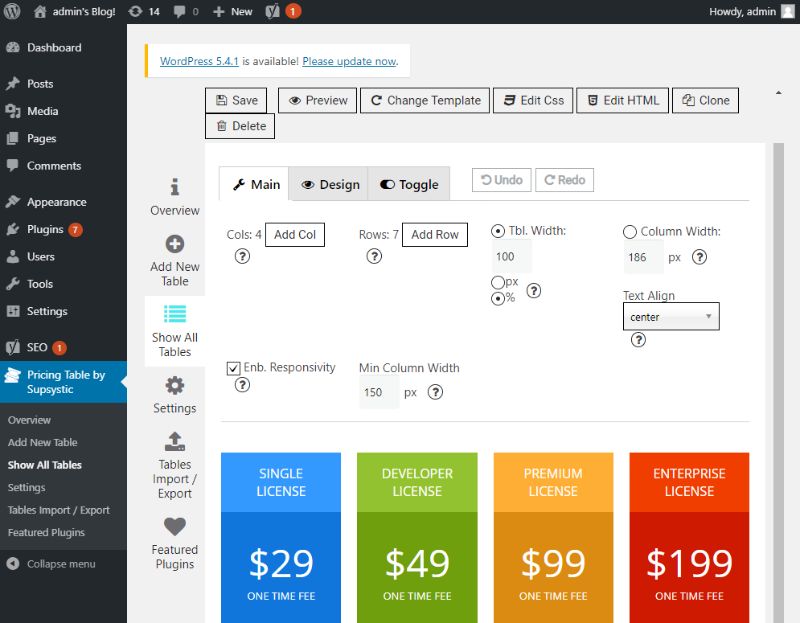
As you can see, the plugin showers you with tons of customization options. For starters, if you want to make custom changes to the template, you can add your own HTML and CSS code using the options in the top toolbar.
Other than that, the list of customization options is categorized under three tabs – Main, Design, and Toggle.
Under the Main tab, you get access to the basic settings that let you configure the layout of the pricing table.
You can use it to add extra columns and rows to your pricing table, control both the table and column width, and even make the pricing table responsive.
Moving to the Design tab, you get access to settings that allow you to play around with the font and colour options.
Here you can choose the font style, configure the text alignment, tweak the padding, and much more. You also get access to granular control over the colour of the text, background, and header.
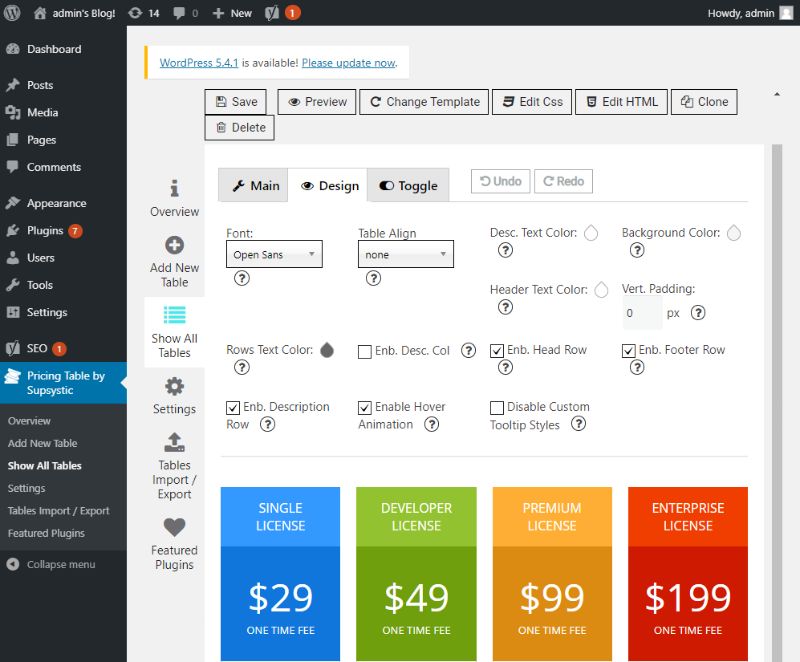
The Toggle tab contains settings that are only available under the paid license.
WYSIWYG Designing Experience
The plugin allows you to point and click on the pricing table elements and allows you to input your own custom figures.
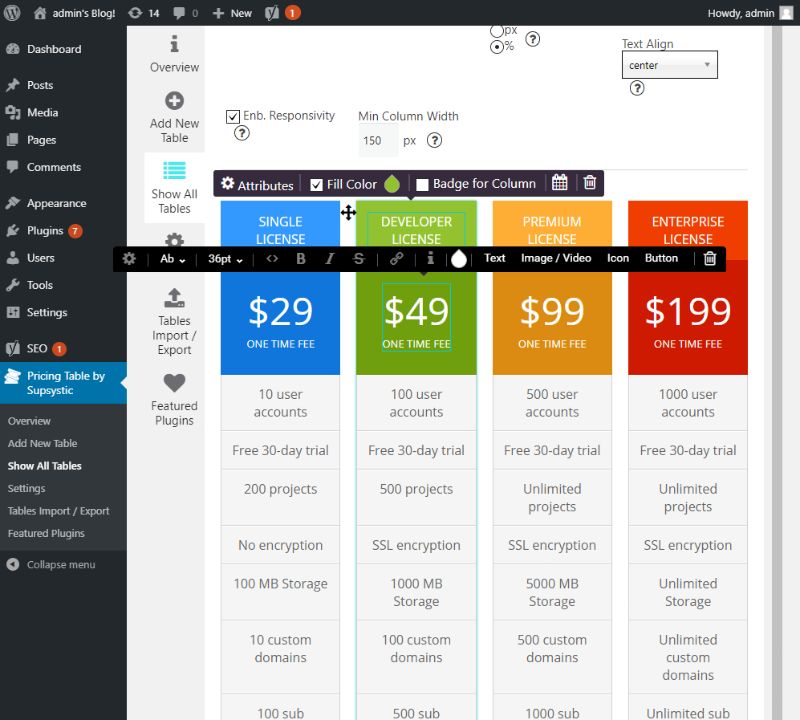
For example, you can click on one of the pricing figures, and manually enter the pricing of your product or service. Similarly, you can click on the service/product name, and change it like that.
As you can see, you will get access to options to stylize the text. There is even the option to add a hyperlink.
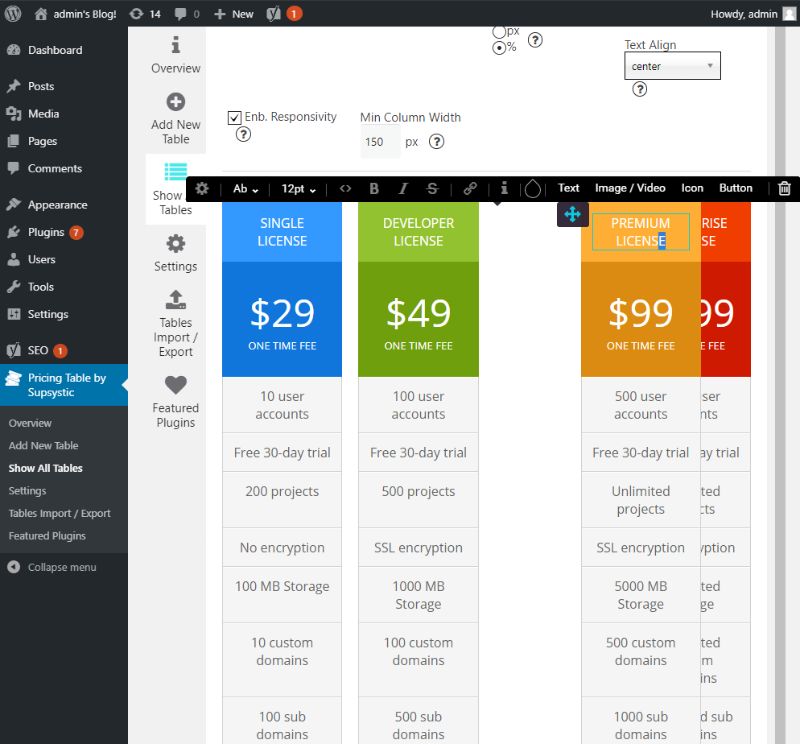
Also, each of the columns of the pricing table can be easily moved around, using simple drag and drop gestures.
Now, once you are done configuring and customizing the pricing table, hit the ‘Save’ button as shown in the image below. You also want to copy the provided shortcode. You will need this to add it to your posts and pages.
Step 4: Add the Pricing Table to Your Posts and Pages
For this tutorial, we will be adding the pricing table to a new WordPress page. However, the same methods apply when adding to your WordPress posts.
You will need to go to Pages > Add New from your WordPress dashboard. Now, you will need to add a new Shortcode block to paste the copied shortcode.
You basically have to click the “+” icon to open up the list of Gutenberg blocks. From there select the shortcode block. Next, just paste the copied shortcode in the provided field and you are done.
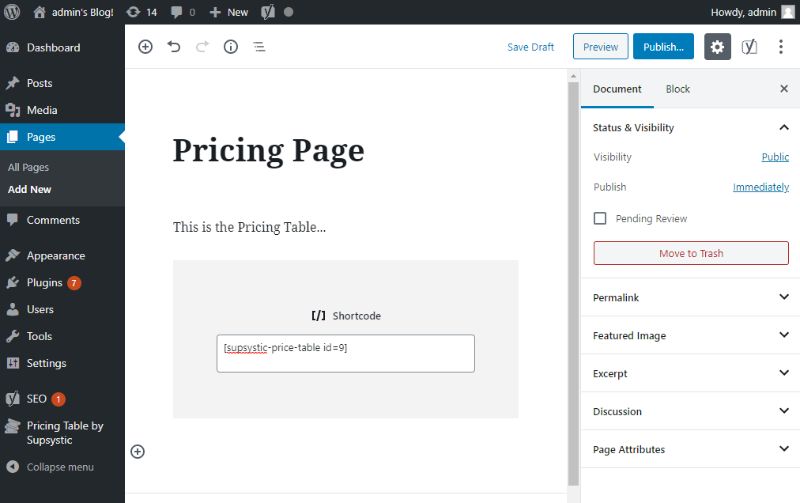
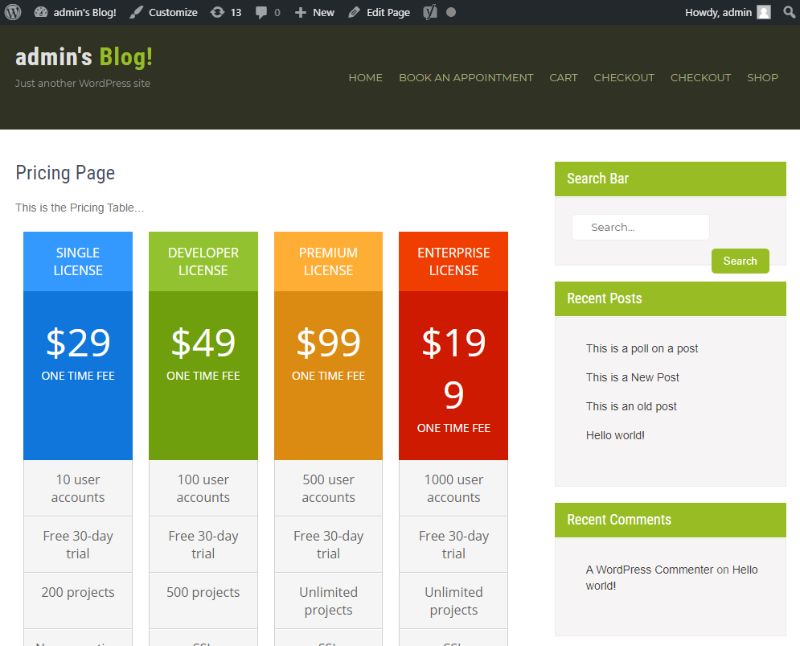
You won’t see the pricing table rendered on your back-end. But, just hit Preview, and there you have it:
Conclusion
So this is how you can create a pricing table in WordPress using the Pricing Table by Supsystic plugin. We hope that you found the read to be useful and that it helped you in creating and adding a unique pricing table to your WordPress posts and pages.
As you can see, despite being a free plugin, you get access to tons of customization features to help you create a pricing table that perfectly fits into your site’s overall aesthetics and design.
You may also want to see our in-depth setp by step guide on how to create a multilingual WordPress site.
0 Comments