Did you ever encounter an issue when you install a large-sized plugin and theme or upload a file via media uploader? In most cases, it is due to the maximum file upload limit. You can fix this issue by increasing the value of upload_max_filesize PHP extension in WordPress.
In this article, I will show you how to increase the maximum upload file size in WordPress.
How to check the maximum file upload size limit
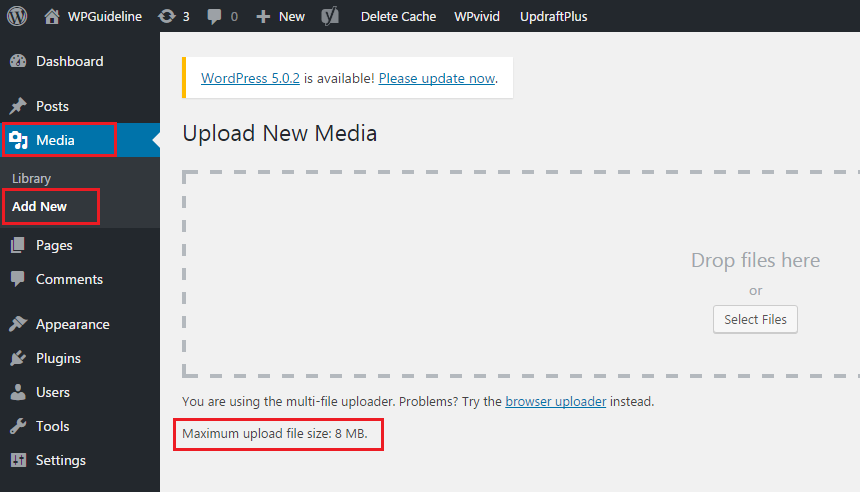
You can check easily the maximum file upload size on WordPress admin dashboard.
To do so, you need to go to WordPress admin dashboard > Media > Add New. WordPress shows it on the bottom of Upload New Media page.
There is an alternative way to check the maximum file upload size limit for your WordPress site.
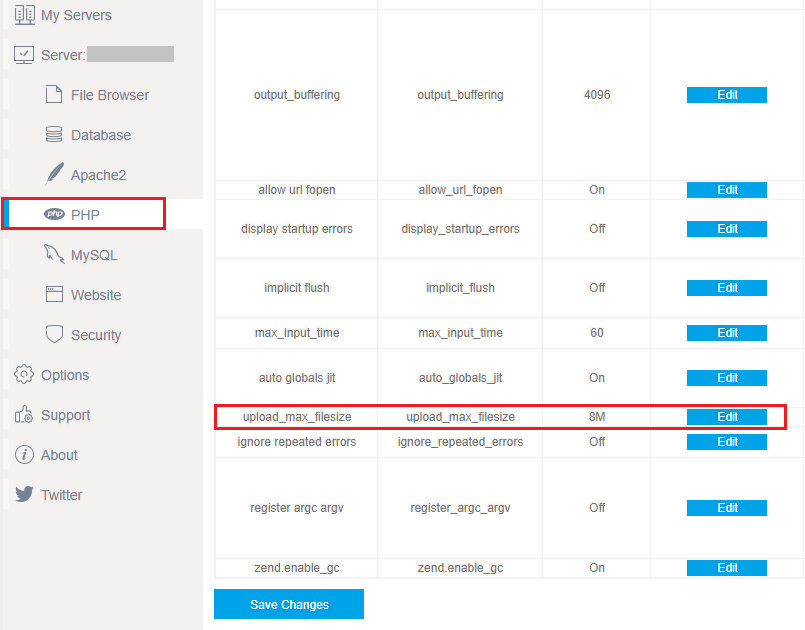
First, download and install VPSrobots which is a desktop control panel for Linux web server. Then sign up and log in it.
Upon connection to your server by VPSrobots, click the current server > PHP > PHP configuration > upload_max_filesize. Then you will see the maximum file upload size limit for your WordPress site.
How to increase the value of upload_max_filesize
There are several methods available to increase the maximum file upload size. Let’s choose the easier ones to learn how to increase the maximum file upload size.
1. Edit theme functions file
One way to increase the maximum file upload size is to edit theme’s functions.php file.
You need to go to WordPress admin dashboard > Appearance > Editor. Then click the functions.php link on the right side menu and open the file.
Next, you need to paste the following code into the bottom of the page. Once completed, update the file by clicking Update File button.
@ini_set( 'upload_max_size' , '256M' );
@ini_set( 'post_max_size', '256M');
@ini_set( 'max_execution_time', '400' );
You can change these defined values as you need.
2. Create or edit an existing PHP.INI file
If the first method doesn’t work to your WordPress site, you can try this one to increase the maximum file upload size.
First, you need to access your WordPress site with an FTP client or VPSrobots.
If you are hosting your WordPress site on a shared hosting, you won’t find the php.ini file in your root folder. Thus, you need to create a new one. Add the following code in the file and upload it to your root folder :
@ini_set( 'upload_max_size' , '256M' );
@ini_set( 'post_max_size', '256M');
@ini_set( 'max_execution_time', '400' );
The above defined values for file size in example can be modified as your needs.
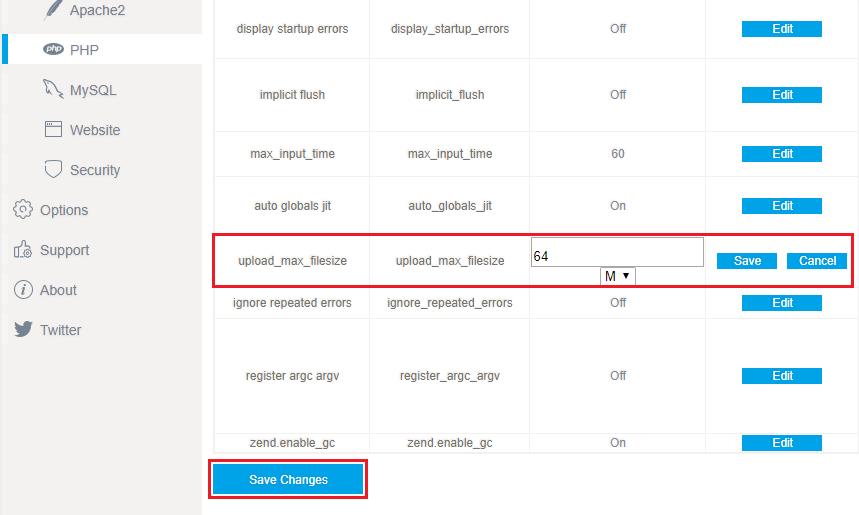
3. Modify PHP configuration via VPSrobots
The third way to increase the maximum file upload size is to modify PHP configuration via VPSrobots.
As the mentioned way, you need to connect your server with VPSrobots, and go to PHP configuration page.
Then Look for upload_max_filesize and post_max_size configuration items on the PHP configuration page.
The values for both configurations are easy to change. Once clicking Edit button and the value is available to edit. Enter the value as you want and click Save button.
Ensure to increase simultaneously both upload_max_filesize and post_max_size configuration.
Lastly, click Save Changes button to take effect.
The above mentioned methods might not work if you are on a shared hosting package. In this case, I recommend you to contact your web hosting provider to increase your maximum file upload size.
Conclusion
We hope this article helped you learn how to increase the maximum file upload size in WordPress. You may also want to see our guide on how to increase PHP memory limit.
0 Comments