Are you wondering how you can add a booking system on your WordPress website?
Depending on what type of business or service you run, having a dedicated booking system can be really helpful for both you and your users.
Clients can come in and make an appointment or request a booking, without having to call your receptionist. Whereas, you get all your bookings and appointment requests neatly organized into a single interface.
As such, for the purpose of this read, we have put together a detailed step-by-step guide on how to add a booking system on your WordPress website. And to help us out, we will be using the Booking Calendar WordPress plugin.
What is The Booking Calendar WordPress Plugin?
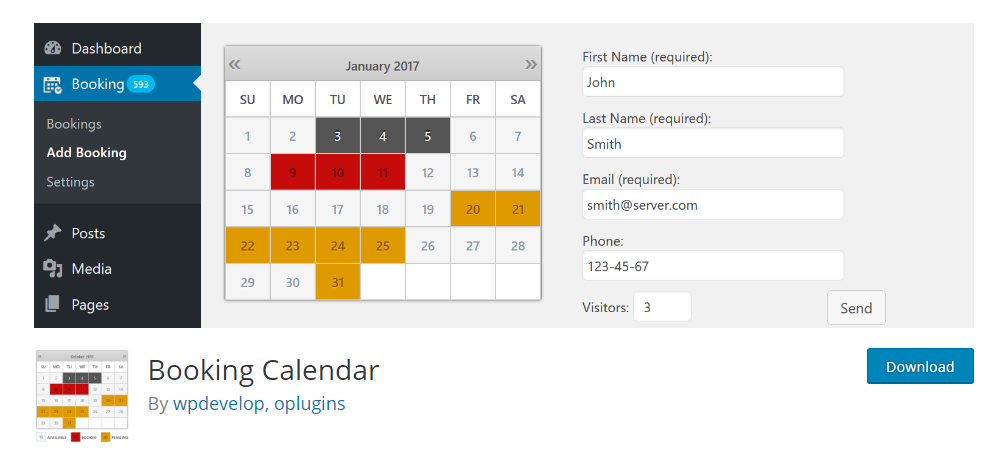
Booking Calendar is a powerful WordPress booking plugin that can help you add a booking system for free. Once installed, the plugin can help you create a custom booking form and add it to your posts, pages, sidebar, and even footer.
Once a user makes a booking, it will automatically send you a notification email. Furthermore, it also adds a dedicated calendar to your WordPress backend from where you can view and manage all the booking requests made by your users.
How to Add a Booking System Using Booking Calendar WordPress Plugin
Now that you have a basic idea about the Booking Calendar plugin, let’s use it to create a booking system on our WordPress website.
Note: For the purpose of this tutorial, we are using the free version of the plugin.
Step 1: Installing The Plugin
Installing the plugin is as simple and straightforward as another WordPress plugin.
You will need to login to your WordPress backend and from there, use the left hand sidebar to navigate to Plugins > Add New. Now type in Booking Calendar in the provided search field and hit Install Now followed by Activate.
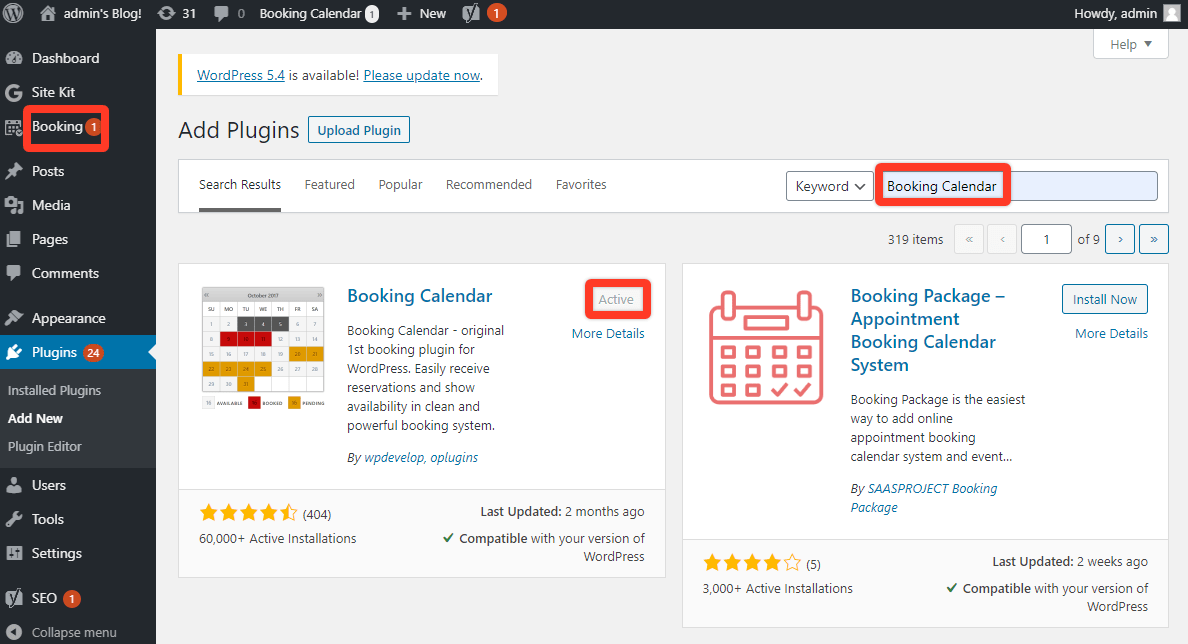
With the plugin installed and activated on your system, you should see a new option – Booking on the left hand sidebar.
Step 2: Configure The Plugin
To configure the plugin, use the left hand sidebar and head over to Bookings > Settings. Here you will find a bunch of options categorized under three tabs: General, Form, Emails, and Sync.
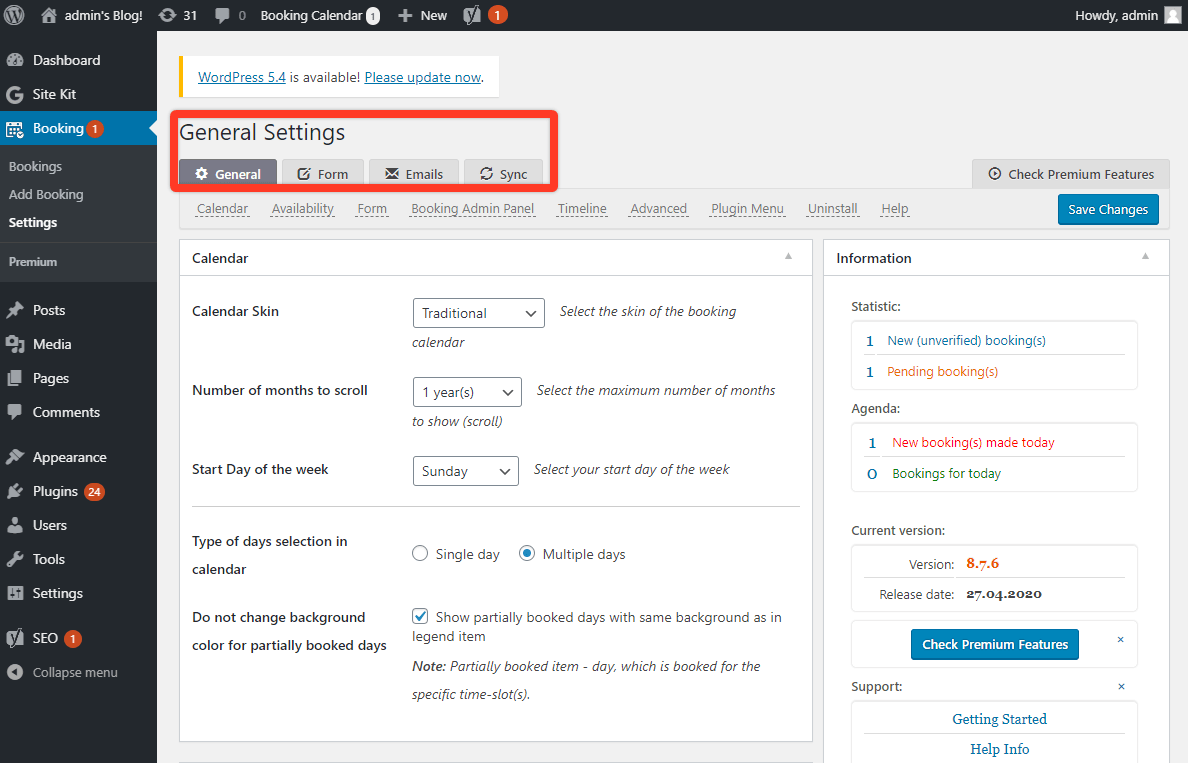
Under the General Tab, you will get access to the basic options.
You can set a calendar skin to customize the look and design of the booking calendar. It also gives you the option to set a Captcha, change the time and date format, and so on.
Apart from this, you can pre-configure set days of the week when you are unavailable – Sundays for example.
Now, in order to change or edit the booking form, we need to head on over to the Form Tab.
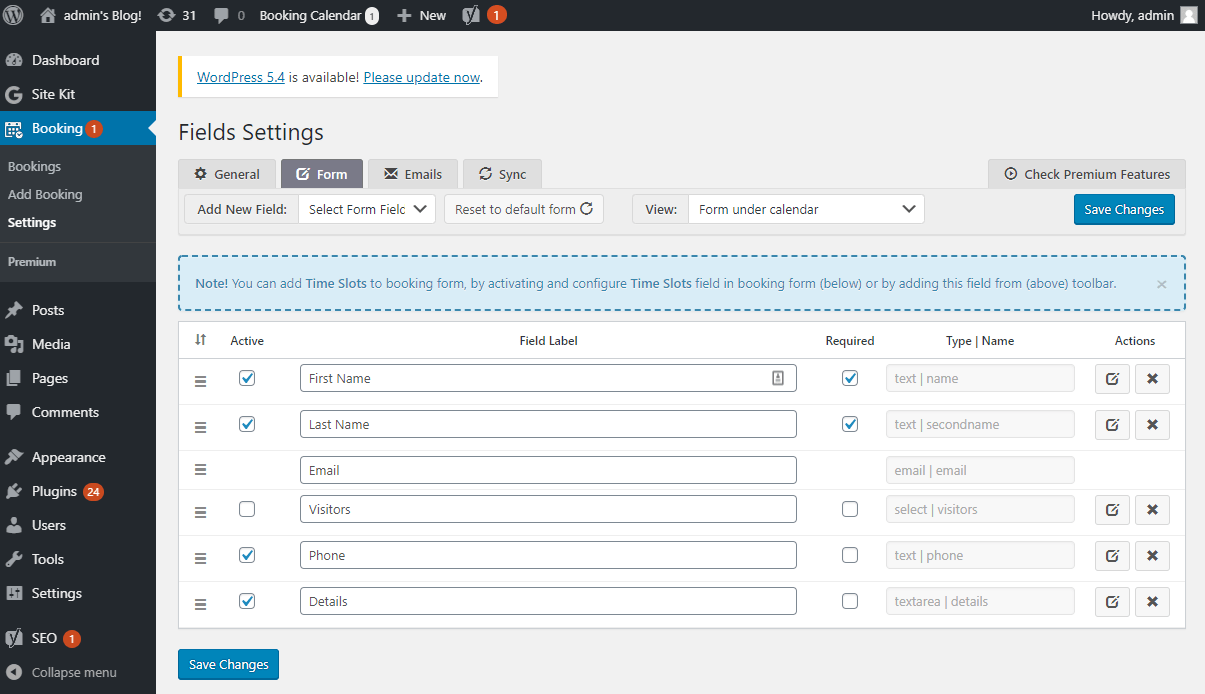
By default, the form consists of only the basic fields which requires the user to provide their name, email, and phone number.
However, if you want to make the form more customized and add extra field, you need to head over to the Add New Field drop down menu.
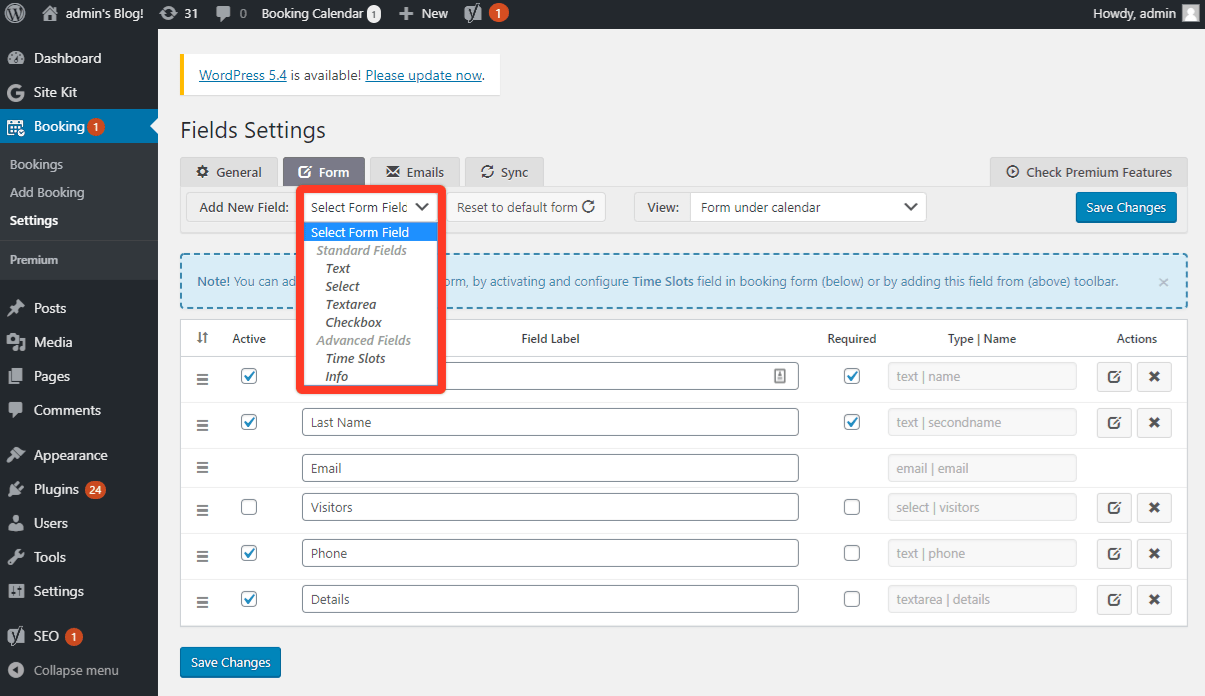
Once done, you can head over to Emails Tab.
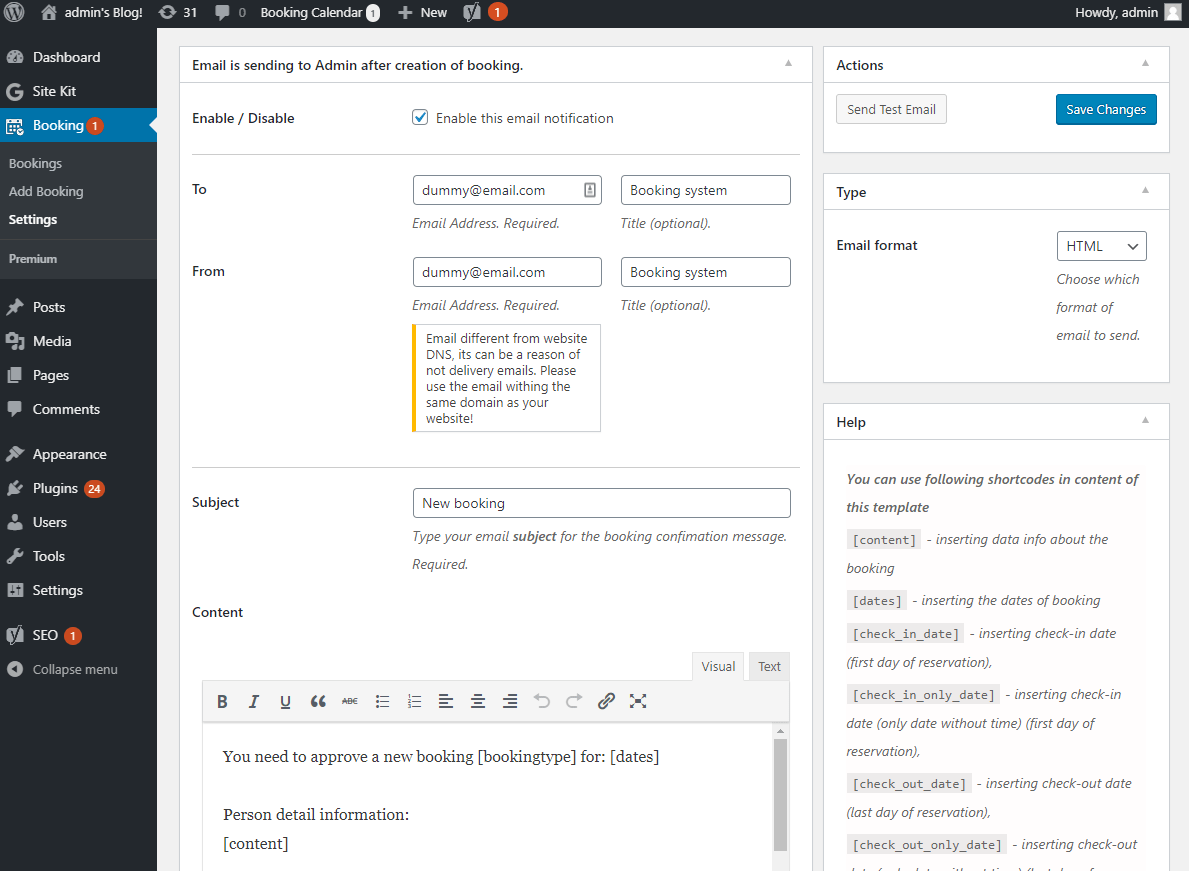
From here you can configure a custom email that will be sent to the admin as soon as clients submit a booking request. This will keep you notified while you are on the go.
Step 3: Adding The Booking Calendar to Your Posts and Pages
From your left hand sidebar, navigate to Page > All Pages.
If you wish to add the booking form to an existing post, select it from the list of all your pages. Otherwise, click on Add New to create a new page dedicated for your booking form.
For users who are using Gutenberg, click on the + icon to search the Booking Calendar block. You will find it under the Common Blocks. Alternatively, you can search for it using the search bar.
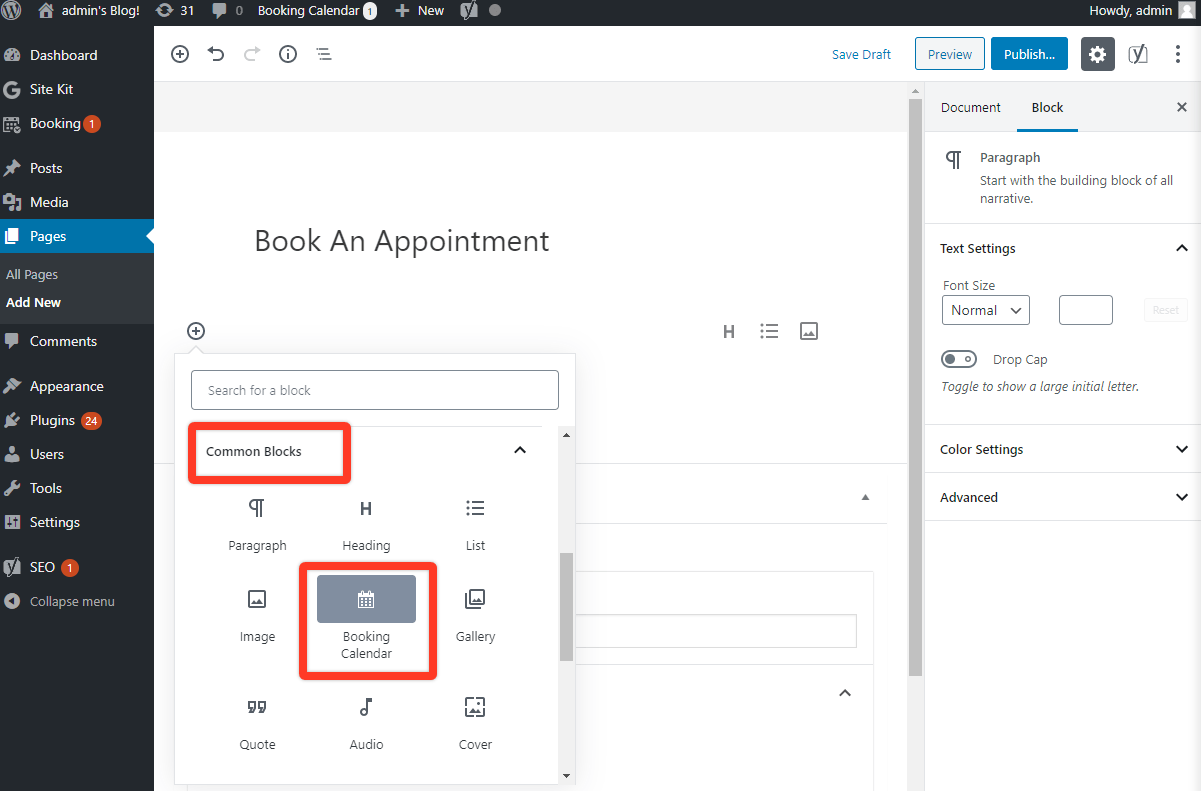
Note: However, if you are still using the TinyMCE editor, you should see a new Booking Calendar icon on the toolbar after installing the plugin.
Once you have added the Booking Calendar block to your page, click on it. A new pop-up window will appear with three sections. Under the Booking Form section, you will find an option – show advanced settings.
Here you will need to enter a shortcode as shown in the image. You can tweak the figures to customize the width and height of the booking form.
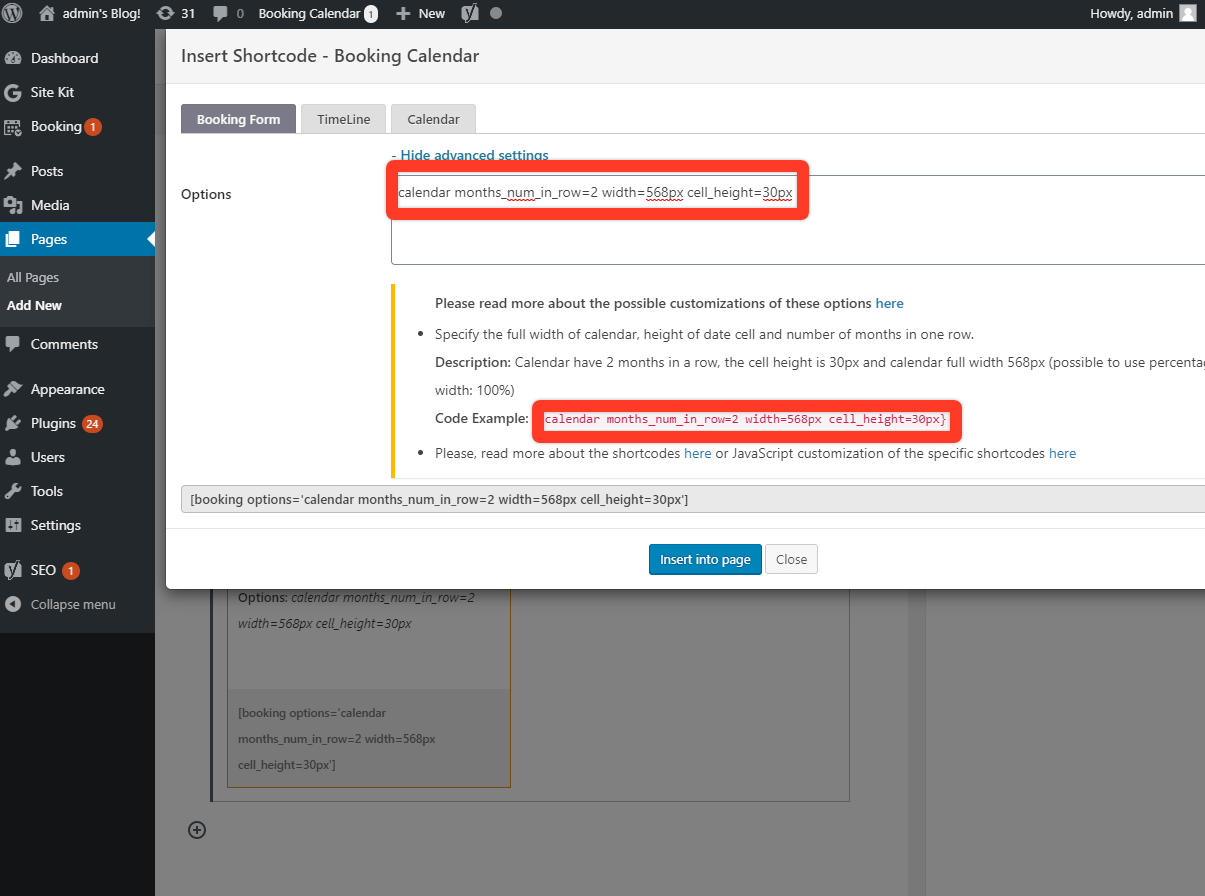
Once done, hit Insert into Page.
Your booking form is now successfully integrated to the page. Click on Preview to see if everything looks right.
Here is a preview of the booking form that we just created:
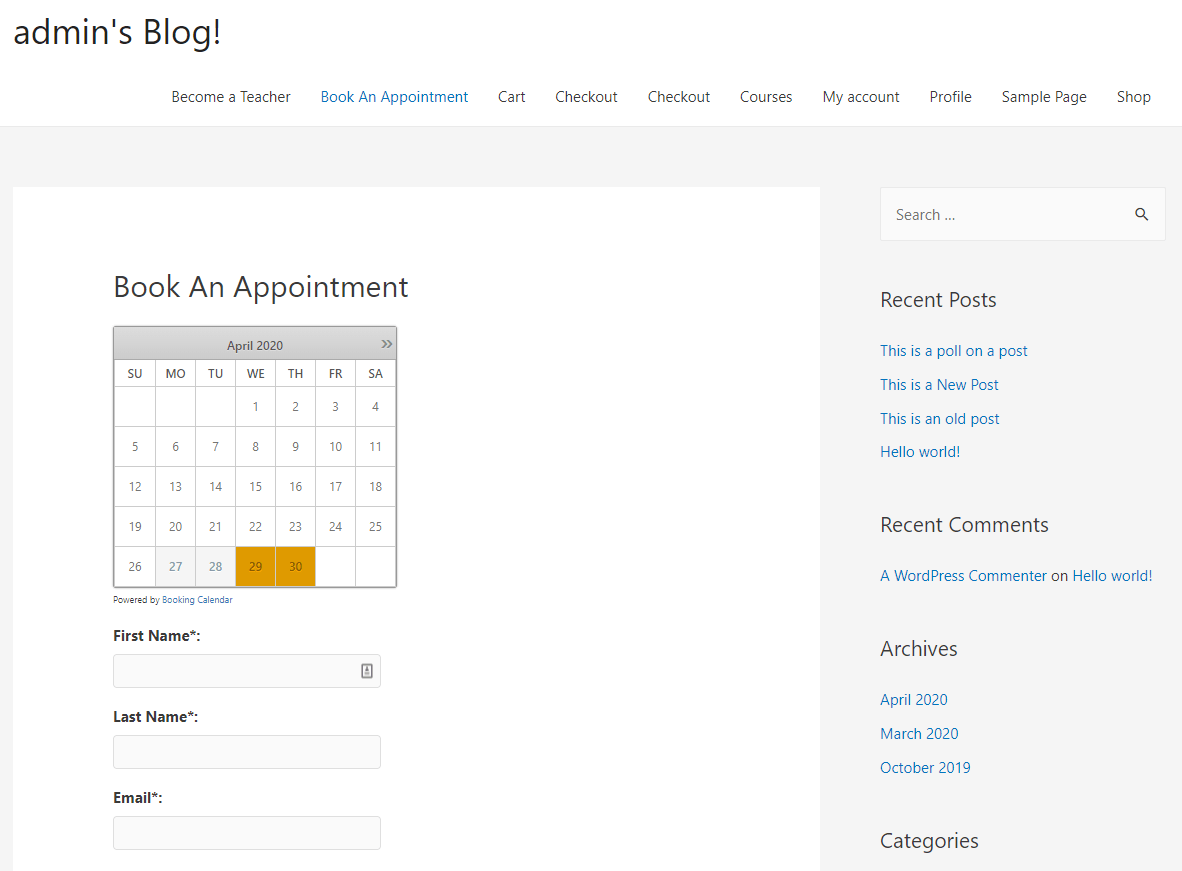
Note: You can follow the same steps to add the booking calendar to your WordPress posts as well.
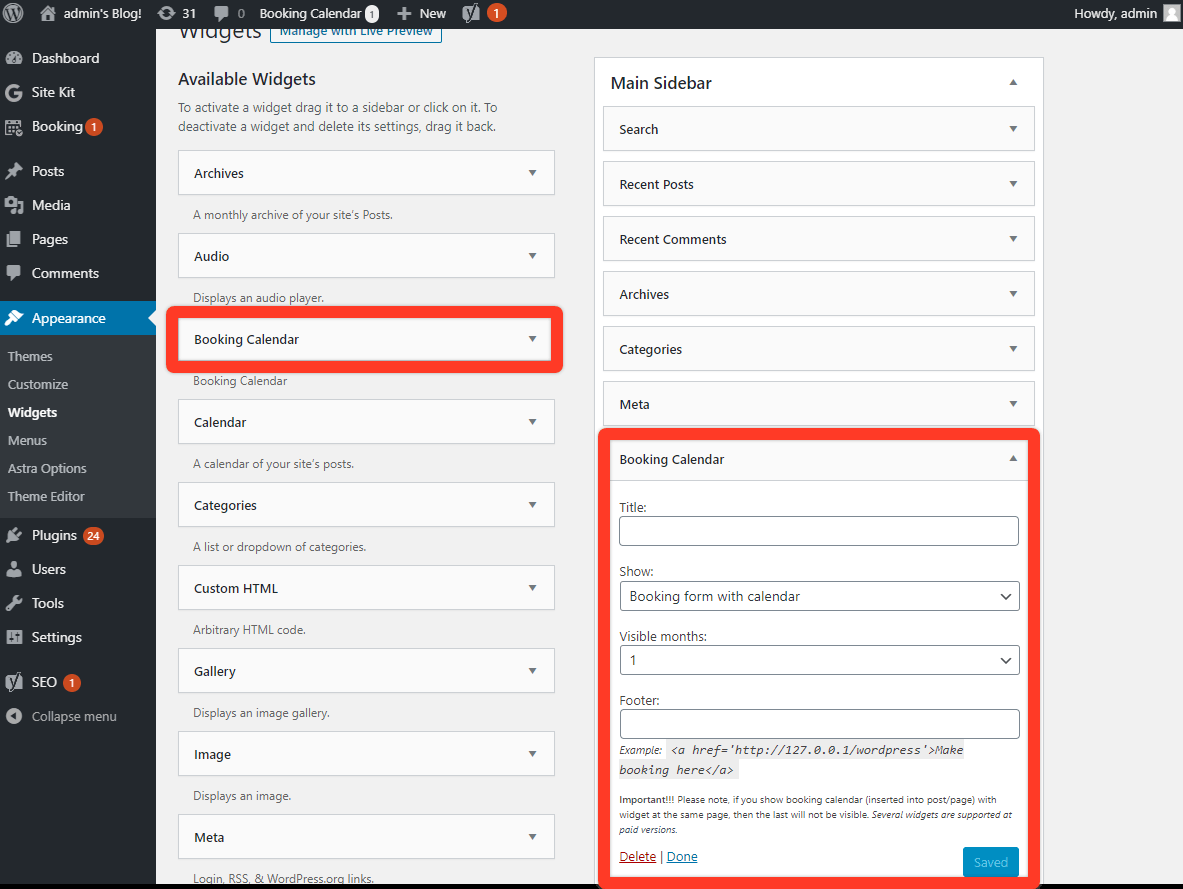
You also get access to widget support which you can use to embed the booking form into your sidebar or footer.
Let’s consider an example where we embed the Calendar Booking form into the Sidebar.
To do this, first go to Appearance > Widgets and from there, drag and drop the Booking Calendar widget into the Main Sidebar area.
Here is how it looks to users visiting your website:
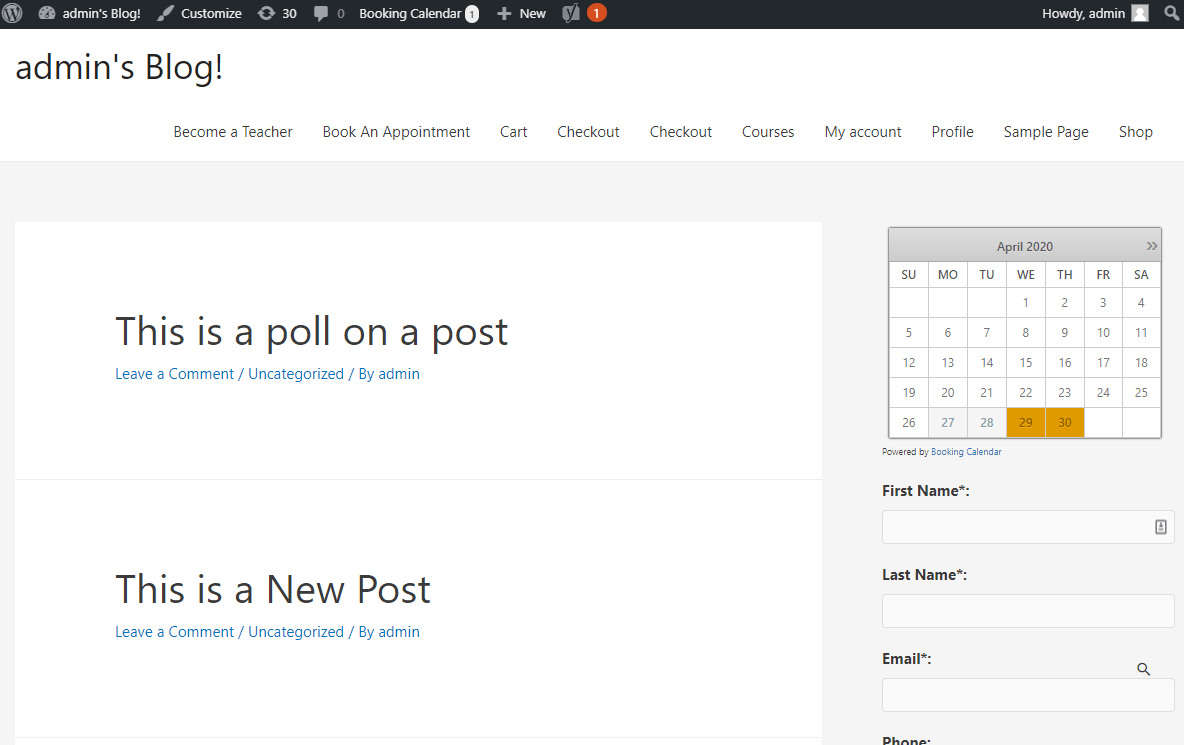
The user can use this to simply select a data, enter their personal data, and hit Send, and you will receive the booking information.
Step 4: Manage All Your Booking Appointments
We have taken the liberty to create a demo booking on dates 5th and 6th May 2020, by a client named John Doe. Now let’s go to our WordPress backend and see how it shows up.
Head on over to Bookings > Bookings.
As you can see, we have the new booking right here.
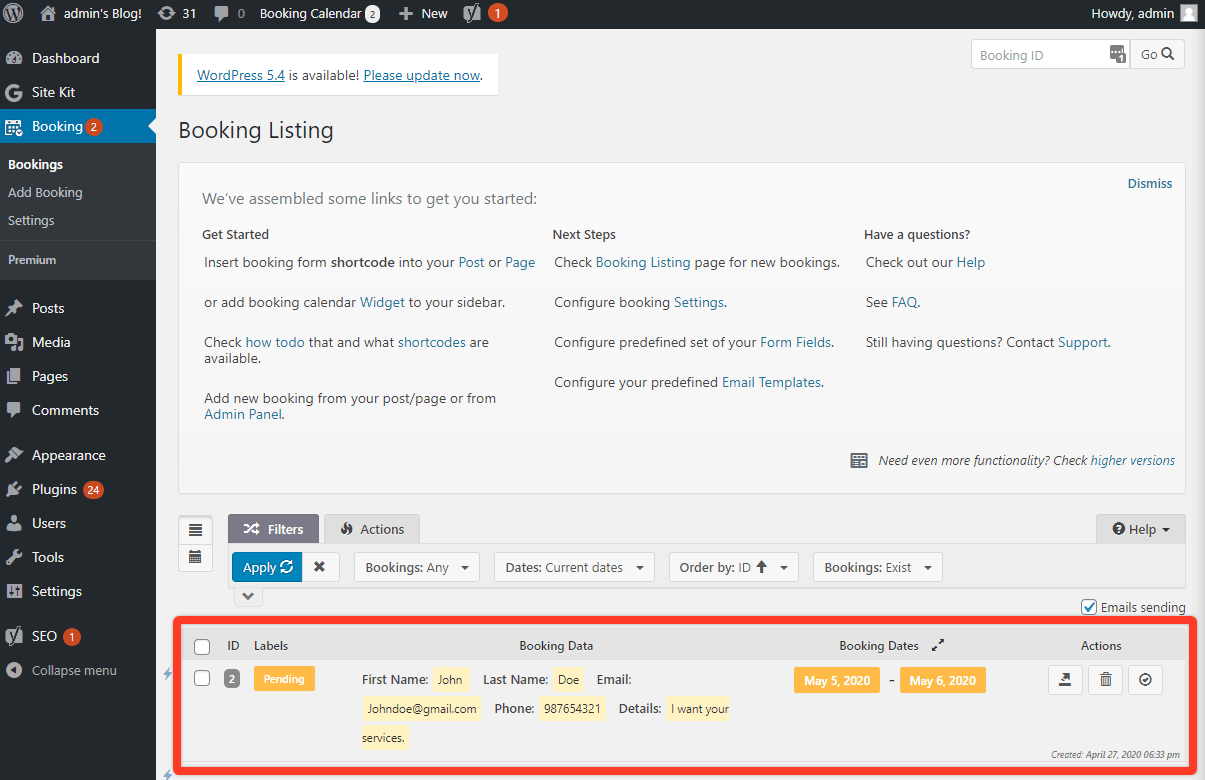
Now from Actions we can either approve it, delete it, or sync the dates without Google Calendar.
Alternatively, we can also switch over to our booking calendar to get an overview of all the appointments we have.
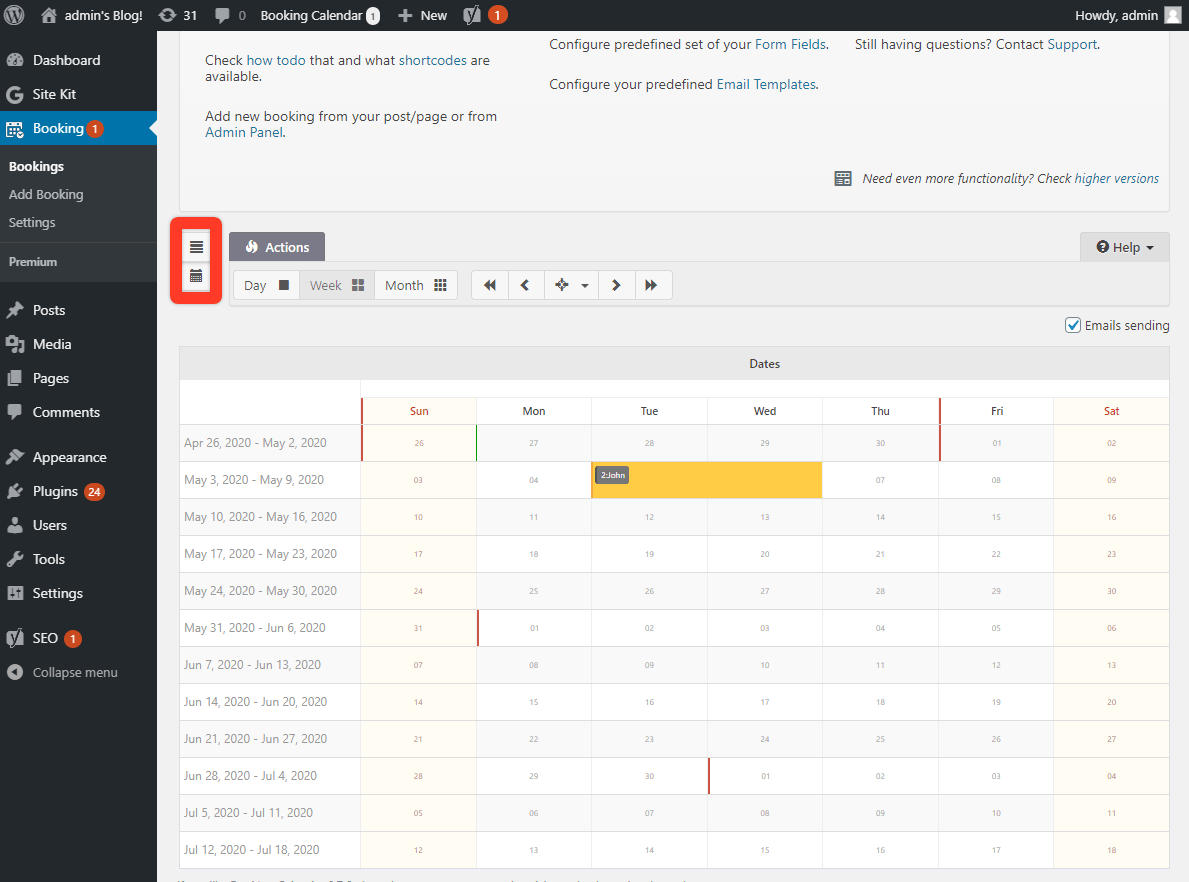
As you can see, the dates 5th and 6th March are marked as booked by “John”. You can also switch the calendar view to day, week, and month to get a more detailed view on all your current and upcoming appointments.
Conclusion
This leads us to the end of our tutorial on how to add a booking system in WordPress. The free version of Booking Calendar comes with all the basic functionalities to help you create a booking form, which you can embed on your WordPress posts, pages and sidebar.
If you are just starting out and looking to integrate a booking system in your WordPress website, then Booking Calendar is definitely worth a consideration.
You may also want to see our step by step guide on how to add Google AMP to WordPress site.
0 Comments