Polls and surveys are an excellent way to increase user interaction on your WordPress website. It also helps you gather information about your user base which can help you create targeted content focused on the users’ needs and requirements. With this in mind, we have put together this comprehensive guide on how to create polls and surveys in WordPress.
Now, as you might already know, WordPress lacks any default features to create polls and surveys. As such, we will be using the YOP Poll WordPress plugin to help us out.
YOP Poll is free to use and readily available from the WordPress plugin repository. But before we dive into our in-depth tutorial on the plugin, first let’s quickly go over what it brings to the table.
YOP Poll Features
Here is a list of the different key features and functionalities that you get with YOP Poll.
- Create, edit, clone, and delete unlimited polls and surveys.
- Option to schedule your polls and surveys. You can set a starting and ending time, configure multiple polls to run simultaneously, or even schedule them to run one after another.
- Add custom fields to ask users additional information through your polls and surveys.
- Reset the poll inputs to restart a poll.
- Limit voting access on the basis of unregistered or even registered users. You can block users’ access by using cookies, IP blocking, and even by username.
- Polls and surveys can be saved in the archived section which can be viewed by the users.
- Flexible options for showing the displaying poll results – before or after entering vote, after poll’s end date, on a scheduled date, or never.
- Use Shortcode to embed Polls and Surveys in any posts or pages.
The plugin also has a premium version introducing many more advanced bells and whistles into the mix.
- Over 30 professionally designed Poll templates.
- Option to ask multiple questions per poll.
- Add images and videos to your polls.
- Insert text boxes to provide instructions, or make the poll a bit more funny and engaging.
- Social login support using Facebook and Google.
- Integrate a live countdown timer with each poll.
- Support for fingerprint enabled voting. Useful if you are collecting accuracy sensitive data.
- Display your poll results using a Pie Chart.
How to Create Polls and Surveys in WordPress with YOP Poll Plugin
Now that you have a basic understanding of the different features and functionalities available with YOP Poll, here is an in-depth step-by-step guide on how to use the plugin to create polls and surveys in your WordPress website.
Step 1: Installing YOP Poll Plugin
First, you will need to install YOP Poll plugin on your WordPress website.
For this, head on over to your WordPress backend dashboard, and from the left hand sidebar, navigate to Plugins > Add New. In the given search field, type in YOP Poll.
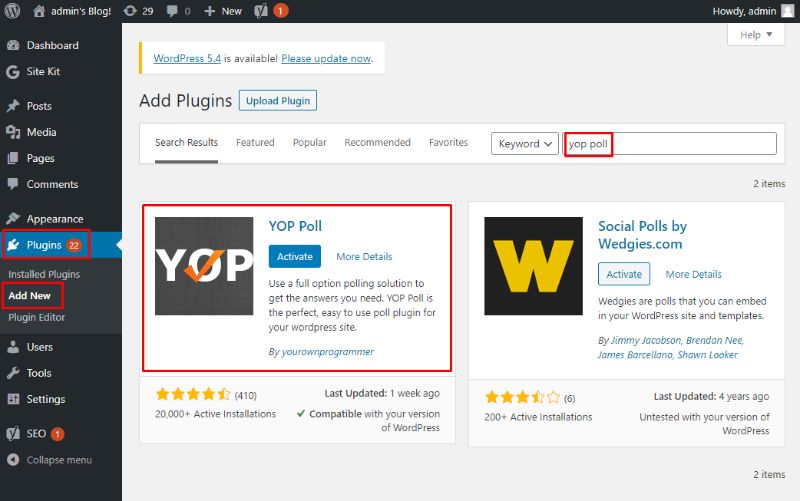
Now, you will need to click on Install Now, followed by Activate, as shown in the image above.
Step 2: The interface of YOP Poll Plugin
After installing and activating the plugin, you will find a new option for YOP Poll in your WordPress dashboard.
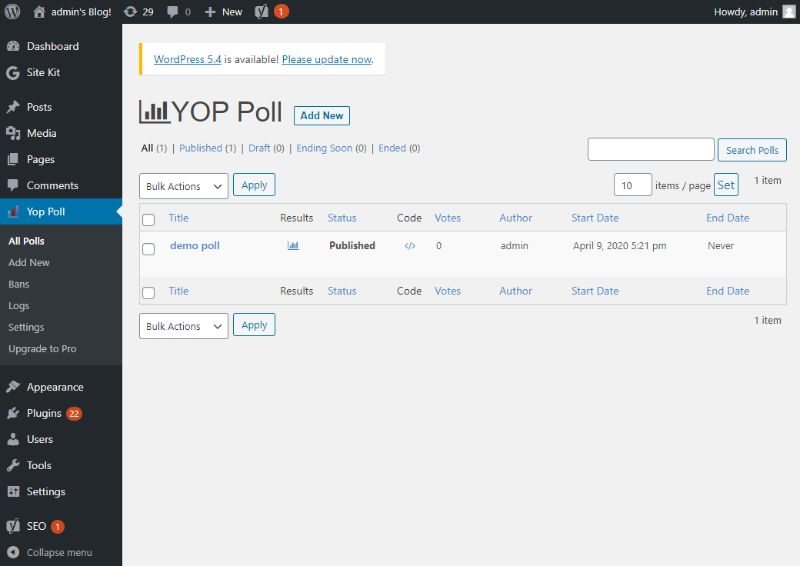
As you can see from the provided image, there is now a Yop Poll option in the left hand sidebar, from where you can see all your polls, add/create new polls, tweak plugin settings, and much more.
Let’s create a new poll to show how the plugin works.
Step 3: Creating a New Poll
You can start creating a new poll by navigating to Yop Poll > Add New.
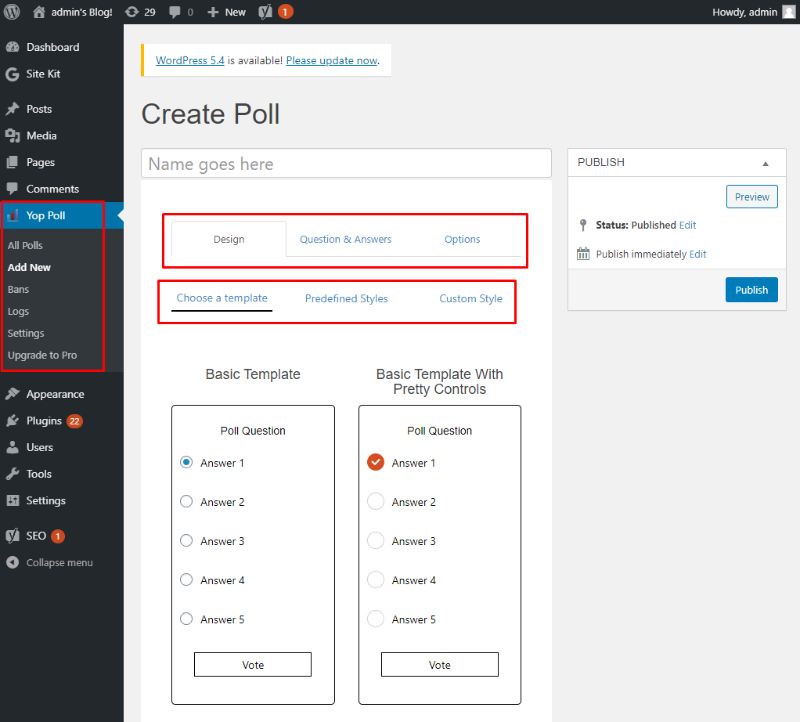
As shown in the image, you will be first required to type in a name or title for the poll.
Next, notice how each poll comes with three sections – Design, Question & Answers, and finally Options. Under each section, there are tabs for further customizations.
Poll Design
Let’s begin by choosing a design for the poll.
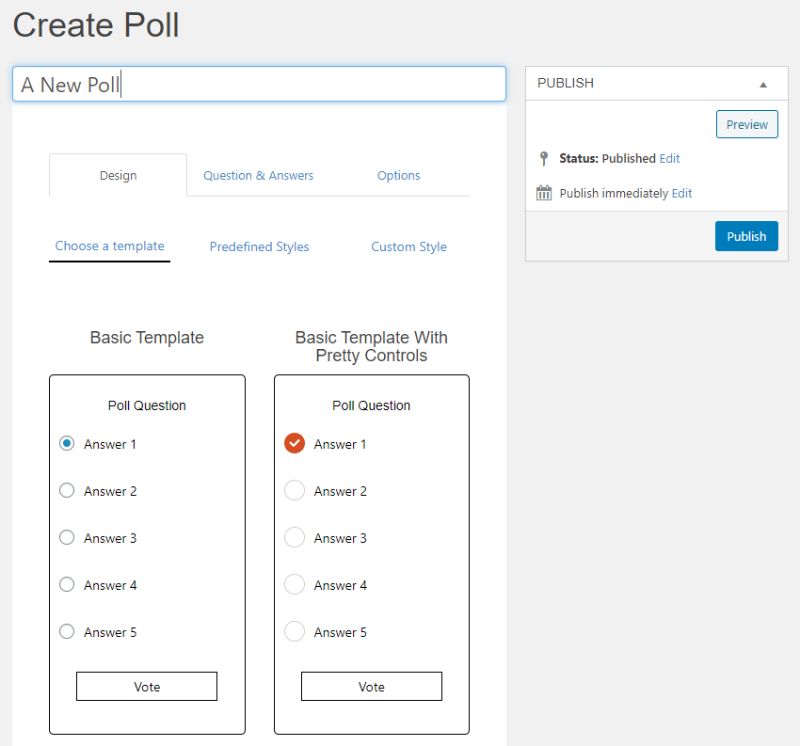
So, as you can see, we are currently under the Design section, and we need to select a template. The free version only supports the Basic Template. However, if you have got the premium version, you can choose from their selection of 30 poll templates.
For the purpose of this tutorial, we have selected the basic template. Once you have done that, you will be given the option to either select one of the Predefined Styles.
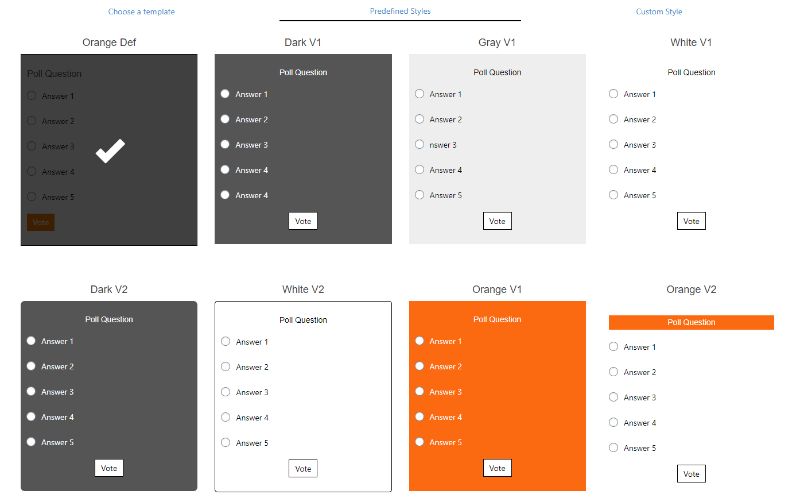
As you can see, there are a lot of options. You can also configure a Custom Style if you like.
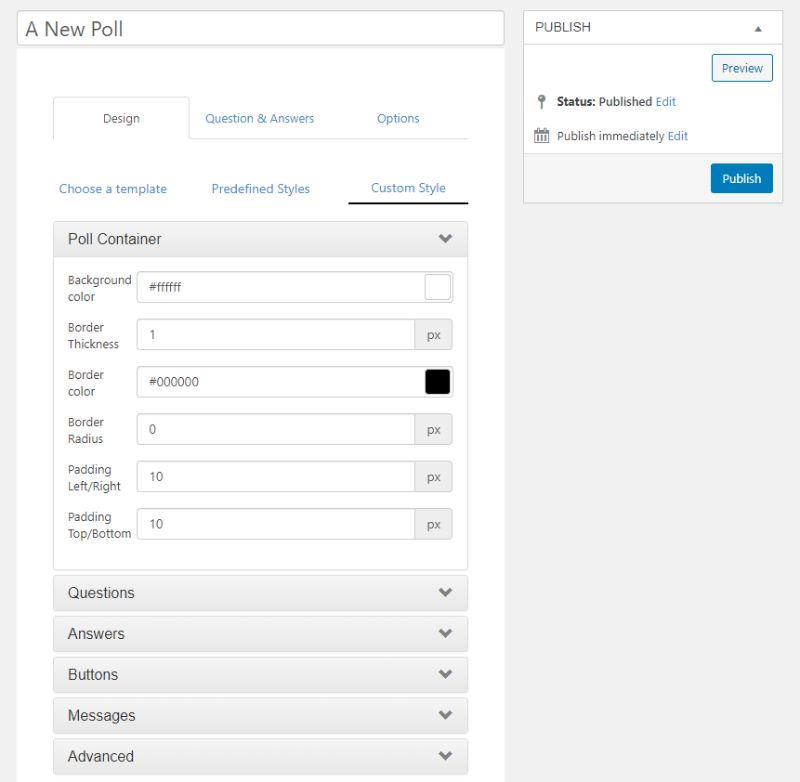
Once you have set how the poll will look, let’s move on to setting the questions and answers.
Poll Question & Answers
Here is where you get to configure the questions and answers for the poll.
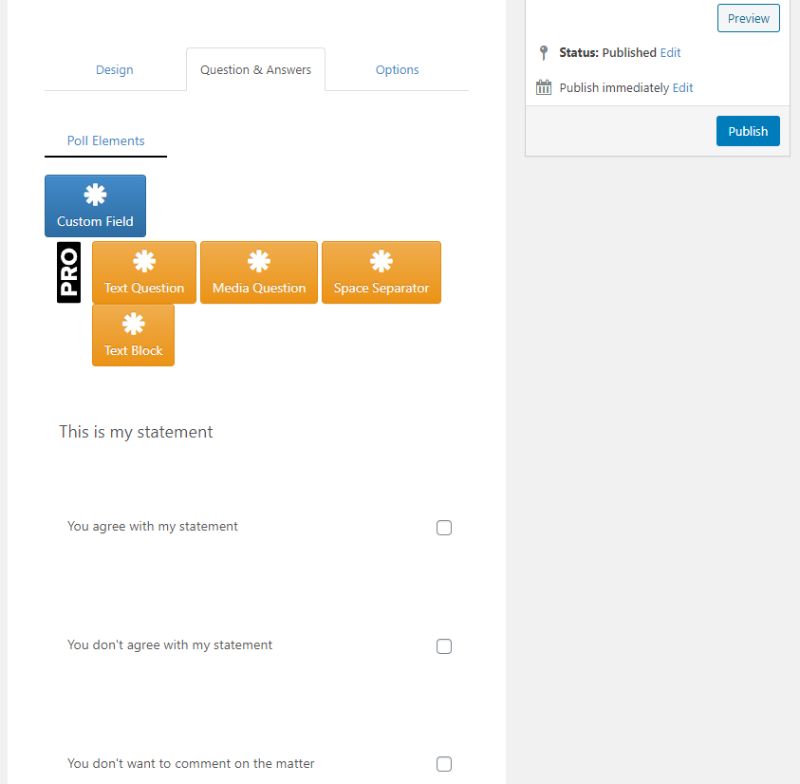
As you can see, if you were using the pro version, then there is an option to add custom fields, text questions, text blocks, media questions, and space separators.
The free version only gives you the option to add the question, along with the different answers the users can select as a response.
Further scrolling down, you will find additional options to configure whether you want to activate multiple answers, allow users to input custom answers, and much more.
Options and Settings
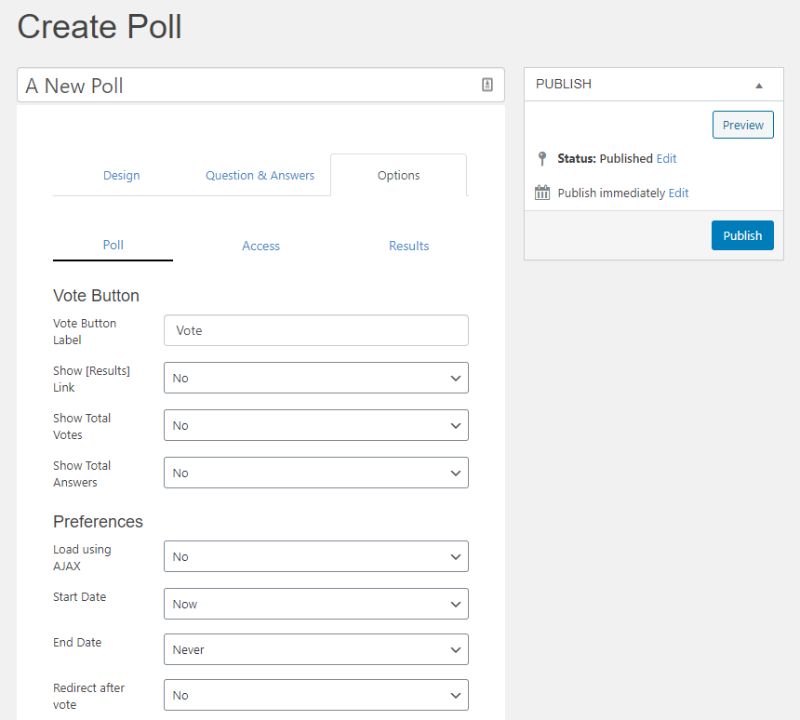
And finally, we come down to the Options sections of the plugin.
Here you will find the basic options and settings to configure the poll.
For example, under the Poll tab, you can change the vote button label, turn on/off Ajax loading, configure a start date and end date for the polls, enable GDPR, turn on Captcha, and so on.
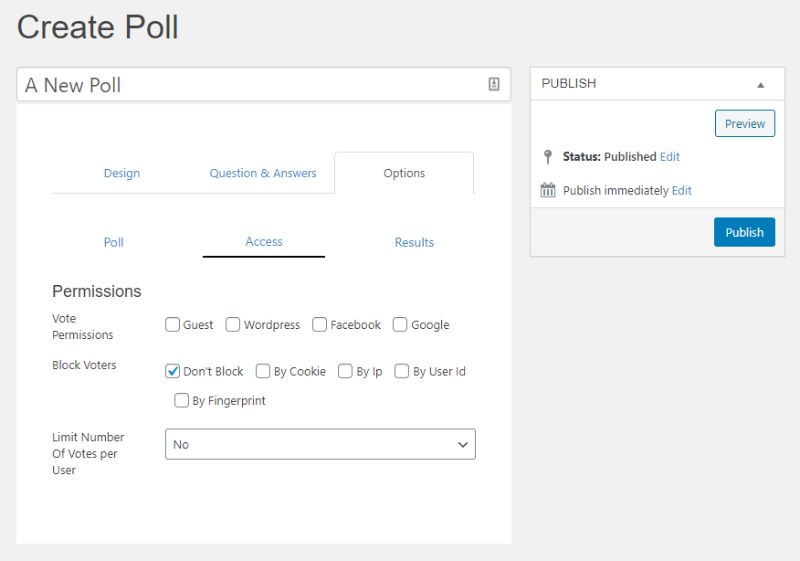
Then under the Access tab you can configure who can vote on your polls. There are even options to block users based on cookie, IP address, User ID, and so on.
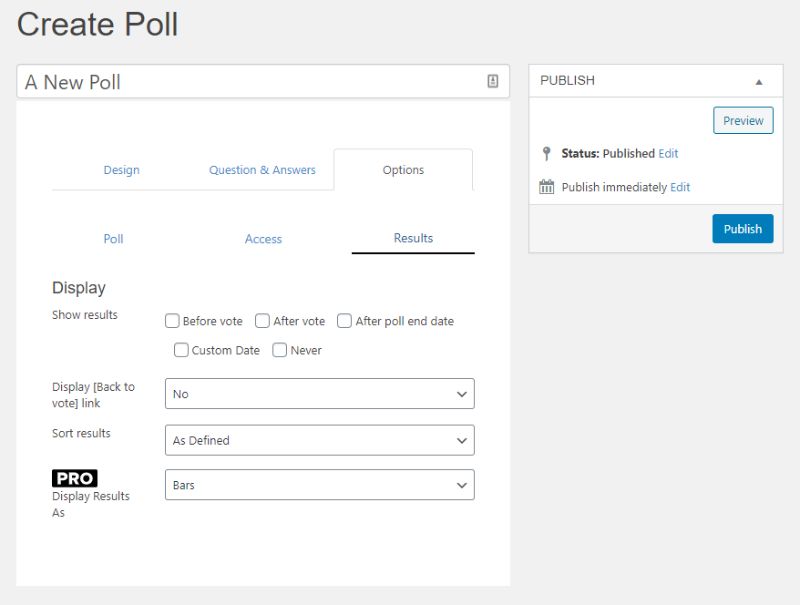
And finally, you have the Results tab where you can set how the poll results are shown.
Now that you have selected a template, provided the poll questions and answers, and configured the poll settings, it’s time to hit the Publish button and your poll will be created.
Step 4: Embedding The Poll In A WordPress Post
Now that you have created a poll using YOP Poll, let’s talk about embedding it on a WordPress post.
First, you will need to go to Yop Poll > All Polls, and then click on the Code icon beside the poll that you want to embed.
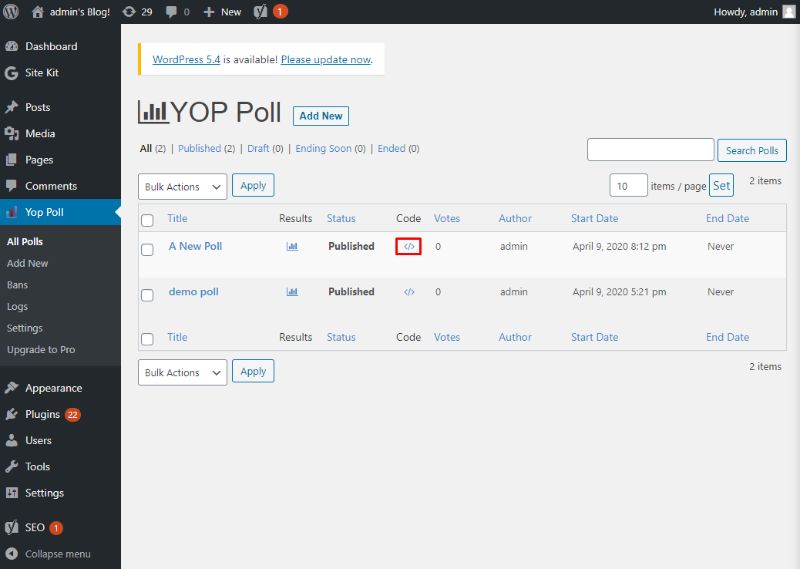
Next, copy the shortcode.
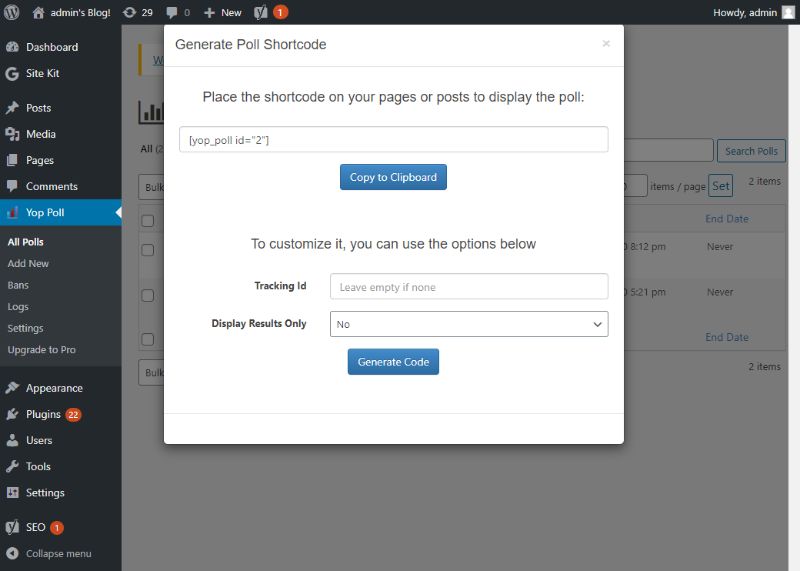
Now, head on over to Posts > Add New and simply paste the shortcode where you want to display the poll. Once done, hit the preview button to see how it looks.
Here is a glimpse of how the poll we just created looks on a WordPress post.
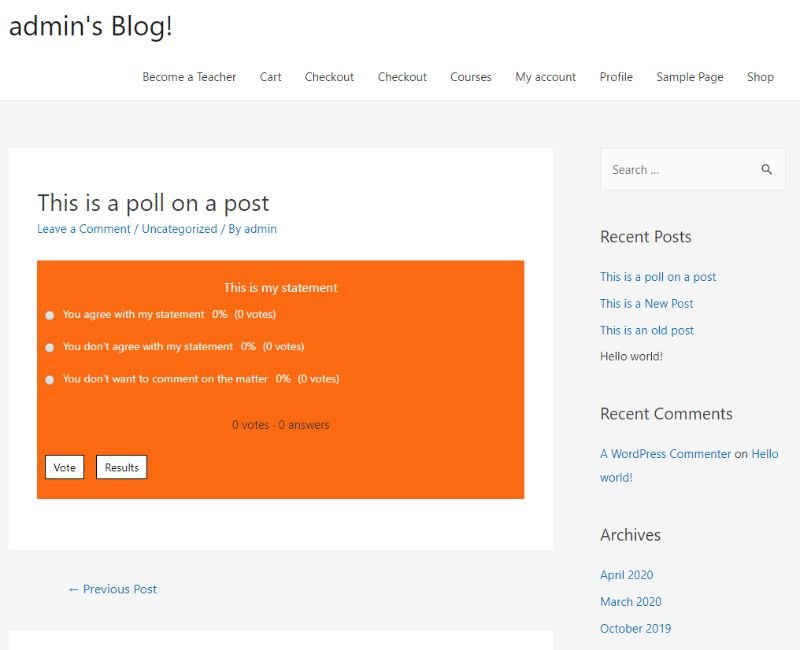
Note: You can follow the same procedure to embed it on a page.
Wrapping Up
Overall, YOP Poll has an extremely intuitive interface. Furthermore, the free version comes with all the basic functionalities to help you create brandable polls and surveys, which you can embed on your WordPress posts and pages.
As such, if you are just starting out and looking to integrate polls and surveys on your WordPress website, then YOP Poll is definitely worth a consideration.
We hope this tutorial helped you learn how to create polls and surveys in WordPress. You may also want to see our step by step guide on how to create a contact form in WordPress.
0 Comments