WordPress Multisite is a powerful tool that allows you to manage multiple WordPress websites from a single WordPress installation. As you can imagine, it is an excellent way to save time and streamline your work. As such, for the purpose of this read, we have put together a detailed guide on how to set up a WordPress multisite.
By the end, you will have full working knowledge of how to activate WordPress multisite for your existing WordPress website, and then how to add new websites to the multisite network.
So without further ado, let’s get started.
How to Set Up a WordPress Multisite
Broadly speaking, there are two methods in which you can set up WordPress multisite. You can either go about it via the cPanel or use an FTP client. However, not all hosting providers include a cPanel. As such, we will be using the FTP method for this tutorial, as everyone can follow along.
Now, the first thing you will need is an FTP client. We will be using FileZilla, but you are free to use any other FTP client of your choice. Once you have picked an FTP client, you will need to connect it to your host.
In case you don’t know how to do so, here is a step-by-step guide to walk you through the process:
- Open FileZilla and log in FileZilla by FTP account.
- At the top, notice the four empty fields – Host, Username, Password, and Port.
- Under Host, enter your web host’s FTP address, followed by your personal FTP username, and FTP password. All these information are available from your hosting provider.
- Once you enter the first three fields, the last field – Ports, will automatically fill itself.
- Next, click on Quickconnect.
- Wait for a few seconds (might even take a couple of minutes) and you will see a message confirming that the Connection has been established.
With FileZilla connected to your web server, you should see all the files and folders on your server populating the four quadrants. From here on in, follow the given steps to set up WordPress multisite:
1. Go to your WordPress root folder, and find the wp-config.php file.
2. Right-click on the file and then select View/Edit. This will open the wp-config.php file in your text editor.
3. Scroll down to the bottom and you should see a line of code that says: “/*That’s all, stop editing! Happy blogging.*/”
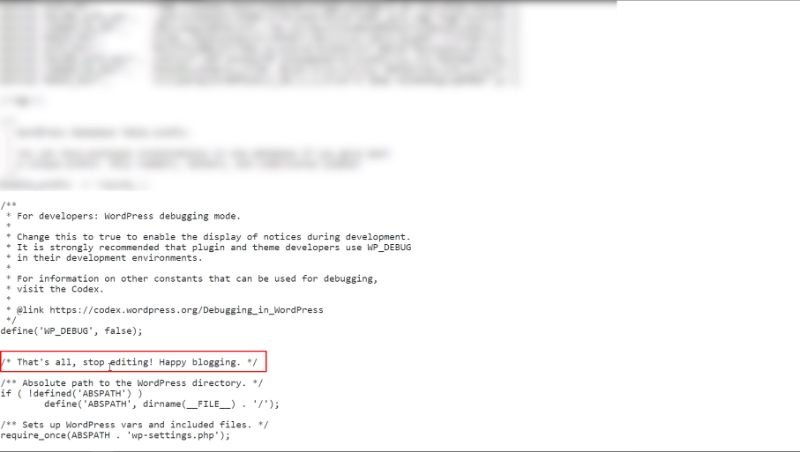
4. Just before this line, paste the given code:
define( ‘WP_ALLOW_MULTISITE’, true );
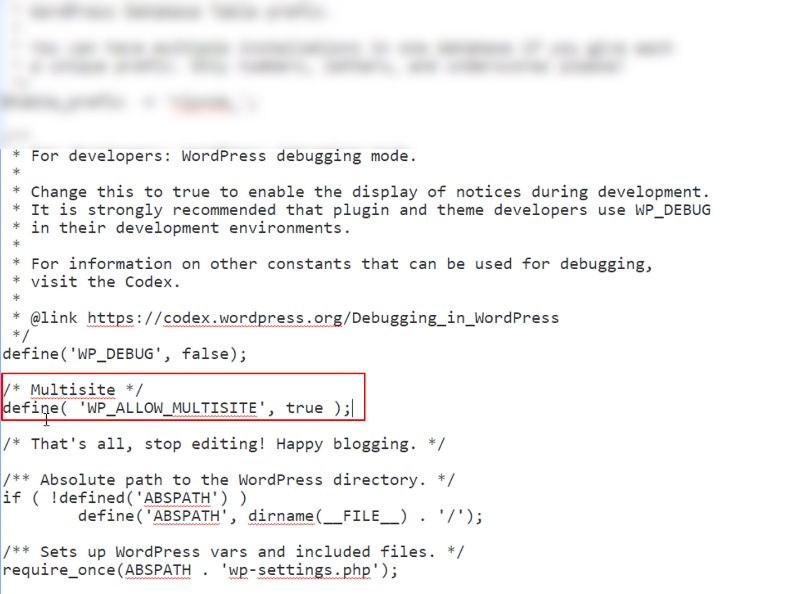
5. Now save your changes and exit the text editor.
6. Go to your WordPress dashboard.
7. Under the Tools section in the left-hand side panel, you should see a new option – Network Setup.
You are now almost halfway through the process.
As you might have guessed, you get to manage all the general settings of your WordPress multisite network from this Network Setup option.
Going inside the option, you will be greeted with the following screen:
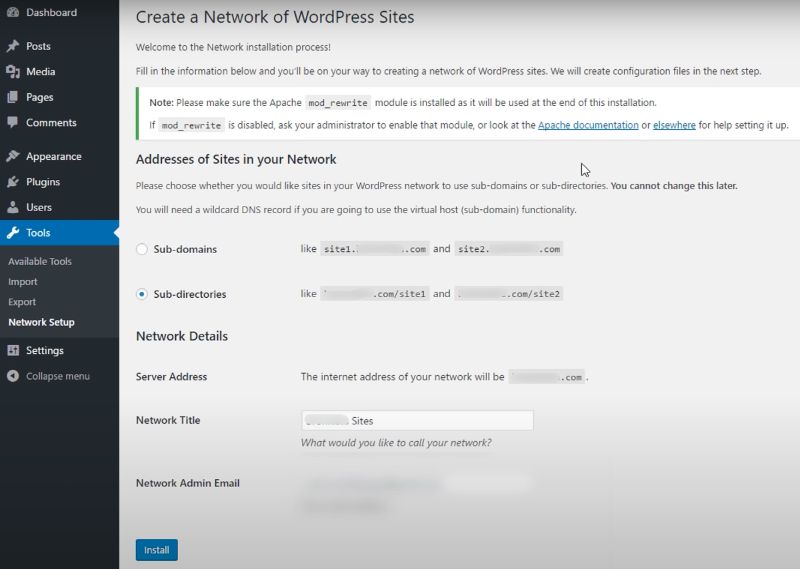
You will first need to choose the domain structure for your multisite network. You can either add a new site as a subdomain or as a subdirectory. Here is the difference:
Let’s say your website URL is “example.com” and you want to add a new site called “Site00”
If you choose subdomain, the URL will look like this:
Whereas if you choose subdirectories, the URL will look like this:
As you can see, the subdomain option looks more professional. However, to enable it, you will need to configure a wildcard subdomain on your server. Here is a quick tutorial showing how you can do that.
Alternatively, you can go with the subdirectories structure, which needs no further setup.
Once you have gone through these settings, you will need to scroll down to the Network Details section. Here you need to set a Network Title, followed by a Network Admin Email.
Alternatively, you can go with the subdirectories structure, which needs no further setup.
After entering this information, hit Install and WordPress will generate two code snippets.
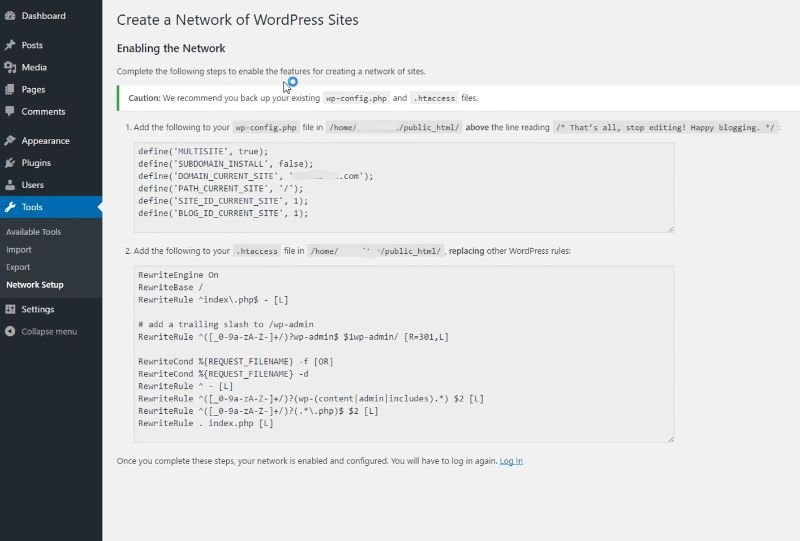
You will need to enter these two code snippets to your wp-config.php file and .htaccess file(also located inside the root folder). You can follow the same FTP method discussed before to add the code snippets to both these and voila – you have successfully set up WordPress multisite.
How to Manage the Websites in Your WordPress Multisite Network
Now that you have created your WordPress multisite network, here is a quick walk through on how to add new WordPress sites to the network, manage site users, and also play around with the installed themes and plugin.
How to Add New Website to Your WordPress Multisite Network?
With multisite activated, you should notice a new option available on the lefthand side panel of your WordPress dashboard. Click on it.
Right now, it should be empty. Just hit the Add New and the following panel should appear.
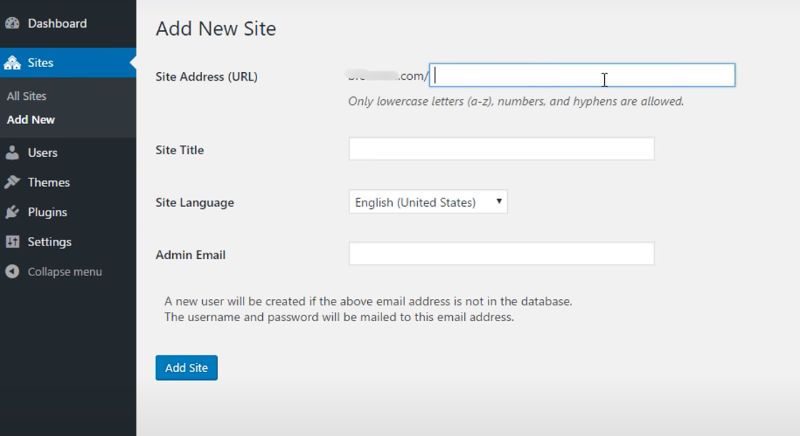
As you can see, all you have to do is enter the Site Address, Site Title, set a Site Language, and configure an Admin Email and you are good to go.
Once done, click on the Add Site button and the new site will be live on your network.
How to Manage Site Users and Contributors?
Every time you add a new site, the Multisite feature will create a new Admin for that site. By default, you will take on the admin role. However, if you wish to pass the responsibilities on to another user/team-member then that too is possible.
You will need to go to WordPress Dashboard > Sites > All Sites. Next hit the Edit button beside the site where you wish to change or add a new user. You should see a top bar with a Users tab. Click on it.
Now, scroll down and you should see the Add New User option. As you can see, here you can enter the Username, provide an email address, and even assign their user role. Once done, hit the Save and you are good to go.
You can follow this simple procedure as many times as you like to add as many users as you need.
How to Manage Themes and Plugins for the Sites on Your Network?
First, let’s talk about installing plugins on your WordPress network.
The process of installing the plugins is the same as before. You can either go to Plugins > Add New to access all the plugins in the WordPress repository and hit the Install Now button or you can upload the plugins from your local storage.
However, when activating the plugin, you have the option to choose whether you want to activate it from your entire network or for specific sites. The respective site admins won’t be able to set up their own plugins on their sites, so you will need to repeat this process for every single site where you want to activate a certain plugin.
In the case of installing WordPress themes, the multisite network works in exactly the same fashion as before. However, here the site admin does have control over which WordPress theme they want to apply to their site.
Conclusion
So this was our quick read on how to set up a WordPress multisite. We hope you found the tutorial to be useful and that it helped you to set up your own WordPress multisite network.
You may also want to see our handpicked list of top nine Instagram feed WordPress plugins.
0 Comments