Having a solid social media presence is key to growing your online businesses. Gaining traffic through SEO is becoming more competitive. As such, diversifying your traffic sources to social media networks can open up doors for new readers to your blog or the customers to your website.
But with that being said, managing your blog is hard enough, let alone taking the time to share your posts on various social media platforms. This is where WP2Social Auto Publish can be of great help.
What is WP2Social Auto Publish?
WP2Social Auto Publish is a WordPress plugin that allows you to auto-publish posts to social media. It gives you access to tons of configuration options to specify how and where you want your posts to be auto-published.
As you can imagine, by automating this simple yet important part of your social media marketing, you can focus your time and effort on the tasks that require your creativity and insight.
Is WP2Social Auto Publish Free to Use?
The WP2Social Auto Publish plugin has both a free version as well as the paid version.
The free version comes with basic functionalities and only allows you to auto-publish posts to Facebook pages. The more advanced options are saved for the premium version which also brings support for other social media networks like Twitter, LinkedIn, Tumblr, and Pinterest.
However, with that being said, the free version of the plugin also comes with some hidden charges. You see, in order to auto-publish your posts to Facebook, you need a Facebook App.
Now, you can either create a Facebook App on your own which can be a bit difficult, or you can use SMAPsolution.com’s App which is recommended by the plugin. The latter will cost you $10 per year and offers 1 month free trial for new users.
WP2Social Auto Publish: How It Works?
Here we have put together a quick step-by-step guide on how to install and set-up the WordPress plugin to auto-publish your posts to social media.
Note: For the purpose of this tutorial, we have used the free version of the plugin to show how you can auto-publish your WordPress posts to your Facebook page.
So without further ado, let’s get started.
Step 1: Installing WP2Social Auto Publish
The first part is to install the plugin on your WordPress website.
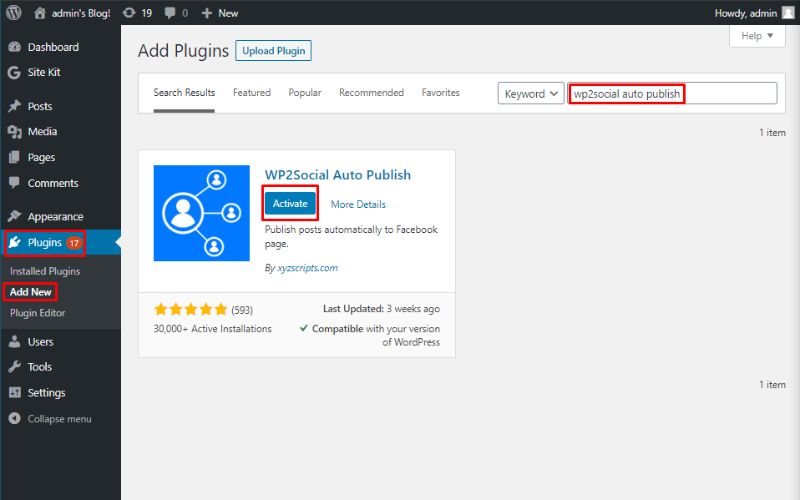
To do this, head over to the backend of your WordPress website, and from the left-hand sidebar on the dashboard, go to Plugins > Add New. Now search for WP2Social Auto Publish in the provided area. Click on Install Now, followed by Activate as shown in the image below.
Once done, the plugin will be activated on your website.
Step 2: Grant Access To The Plugin
With the plugin activated on your WordPress website, you should see a new option on your backend dashboard. Click it to open the following interface.
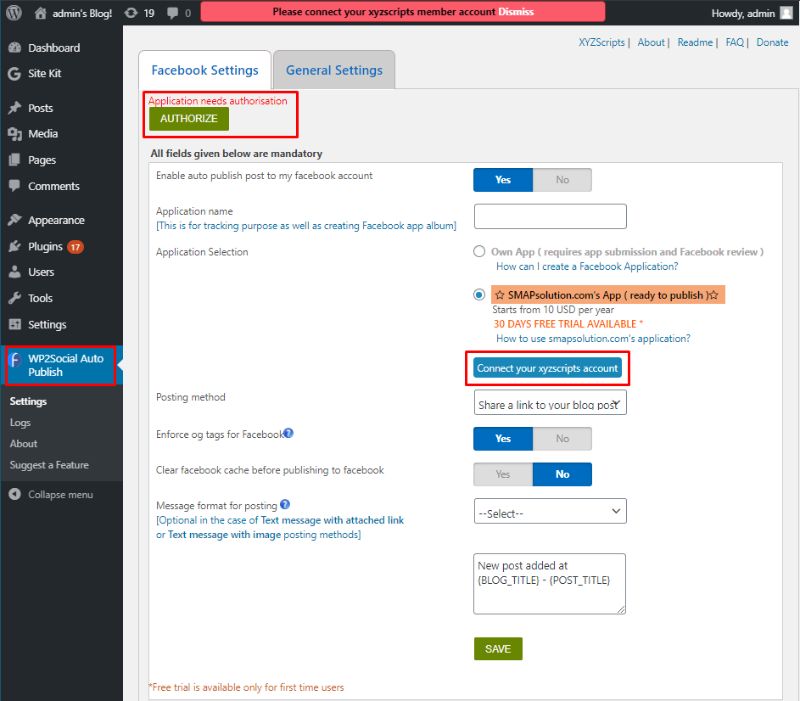
As you can see, you will first need to authorize the plugin.
Click on the ‘Connect your xyzscripts account’ button. A pop-up window will appear.
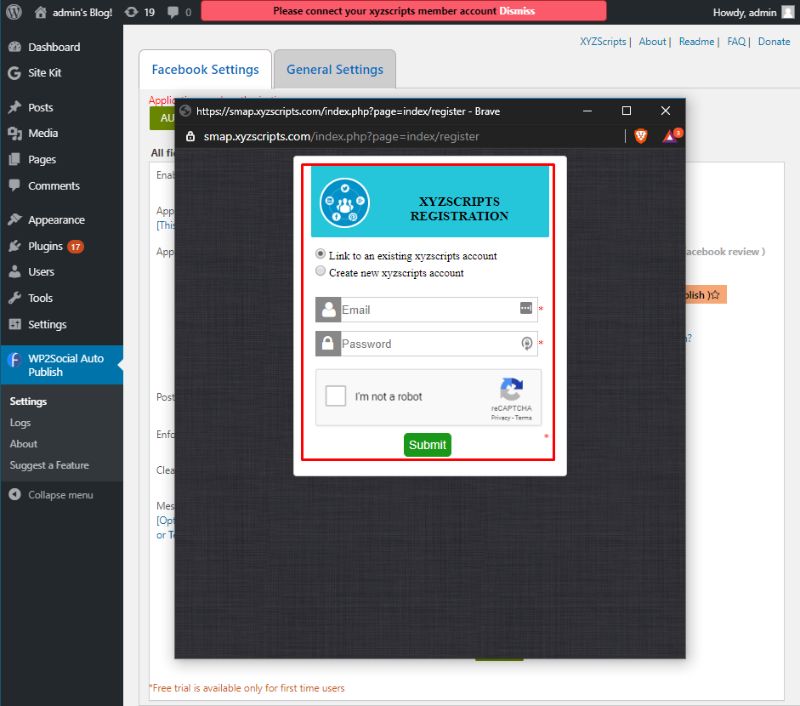
From here you will need to log-in to your xyzscripts account. If you don’t already have one, there is an option that allows you to create a new account.
Once you are connected with your xyzscripts account, hit the AUTHORIZE button to grant permission to the plugin to automatically publish posts to your Facebook page.
Step 3: Configure Facebook Auto-Publishing Settings
Once you are done setting up the plugin and granting access to your Facebook page, it is time that you start to configure the Facebook auto-publishing settings.
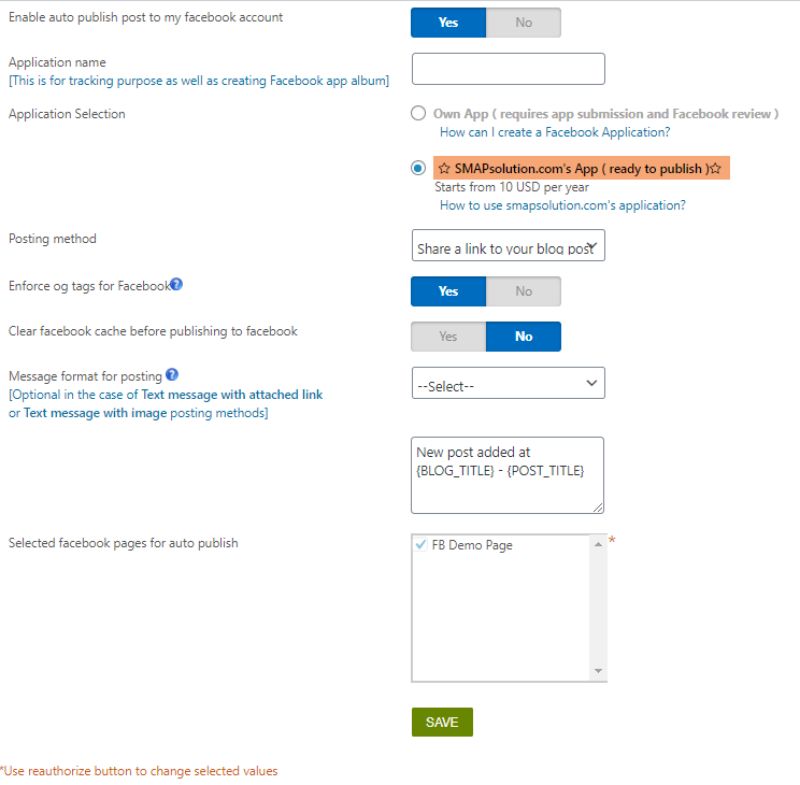
1. First things first, you will need to enable the auto-publish options. It is turned on by default.
2. Next, provide a custom Application Name. This can be anything you like and will be used for tracking the auto-published posts, and will also create a Facebook app album with all your auto-published posts.
3. Once done, you will have to select the Facebook App that you will use. You can either choose your own app or go with SMAPsolution.com’s App which costs $10 per year.
4. Now, you will have to select the posting method from a list of options in a drop-down menu.
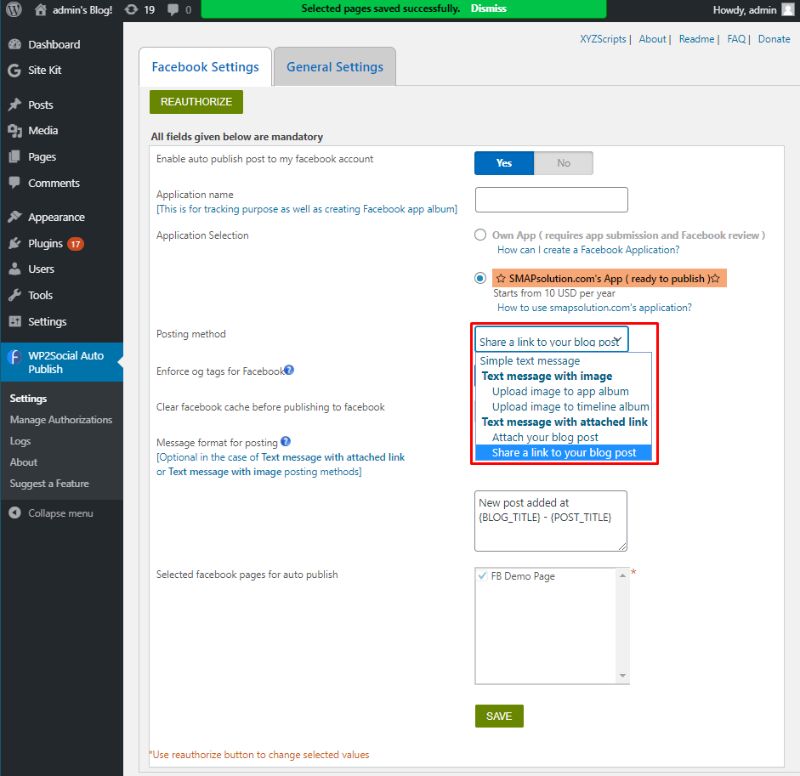
The free version is only limited to the following options:
- Post as a simple text message.
- Publish as a message with images that are either from the app album or timeline album.
- Publish a text message along with an attached link to your post. You can either attach your blog posts or share a link to your blog post.
5. The following option allows you to enable/disable open graph tags for Facebook.
6. You can also configure the plugin to delete your Facebook Cache before publishing a new post to the social media platform.
7. Once you’re done with all this, you need to select the Message format for posting.
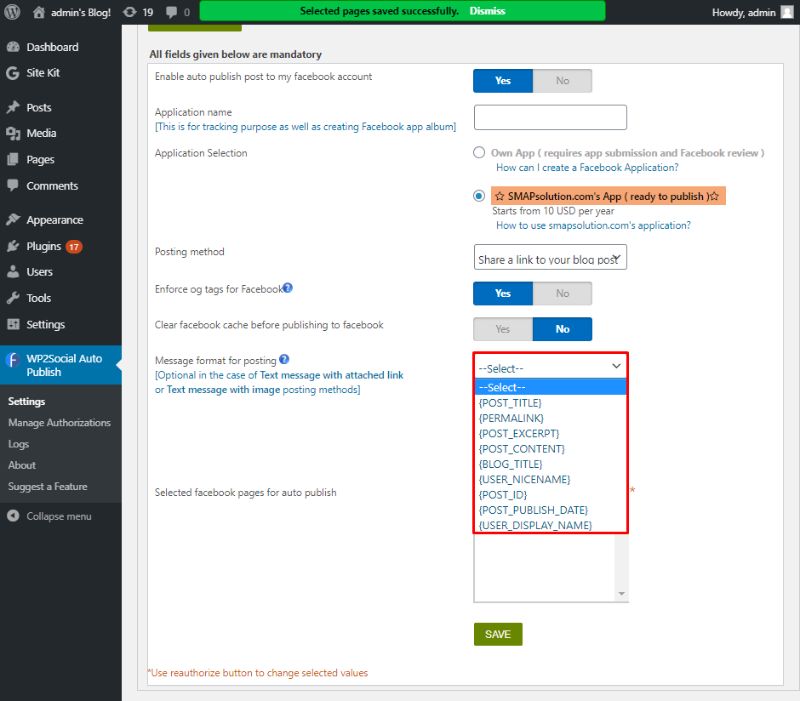
8. And finally, you have the option to select the Facebook pages that you want to allow for auto-publish.
Once you have configured the plugin according to your preference, hit the SAVE at the bottom.
Step 4: Adding The Final Touches
Once you are done configuring the Facebook settings, you should head over to the General Settings tab.
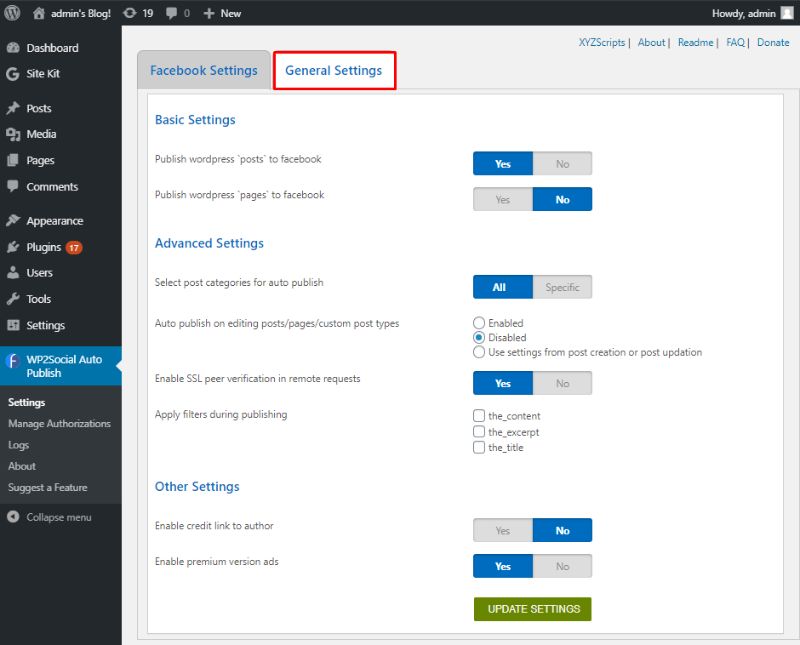
Here you will find the following option:
- Enable/disable whether you want to auto-publish both your WordPress posts as well as WordPress pages to Facebook.
- Select specific post categories or all categories for auto-publishing.
- Specify whether you want to auto-publish a post, page, or custom post type when it is updated/edited.
- Enable/disable SSL peer verification.
- Apply different filters during publishing any content, excerpt, and title.
- Give a credit link to the author in a shared post.
Once done, hit the update settings button and you are done.
Step 5: See Your Auto-Published Posts
Once you have properly set up and configured the plugin, it will start to automatically share your WordPress posts (and pages if allowed) to your Facebook page. You can go to the Logs section to see which posts have been shared and when.
Conclusion
If your social media marketing is solely focused on Facebook, then WP2Social Auto Publish can really help you out by automating the boring stuff. Yes, you have to pay around $10 per year, but if you can build your own Facebook App (which isn’t that hard) then it is completely free to use, coming packed with all the necessary bells & whistles.
I hope this article helped you learn how to auto-publish WordPress posts to social media with WP2Social Auto Publish plugin. You may also want to see our guide on how to create an online course with WordPress.
0 Comments