You may ever be annoyed by an error: an allowed memory size exhausted which looks like Fatal error: Allowed memory size of xxxxxxxx bytes exhausted (tried to allocate xxxxxxxx bytes). This is one of the most common WordPress errors. In most cases, this is due to the insufficient memory allocated for PHP script. Acutally, you can increase PHP memory limit to fix the error.
This article will show you how to fix an allowed memory size exhausted error in WordPress.
How to check PHP memory limit
In order to check PHP memory limit, we need to install VPSrobots which is a freemium linux server control panel based on windows platform.
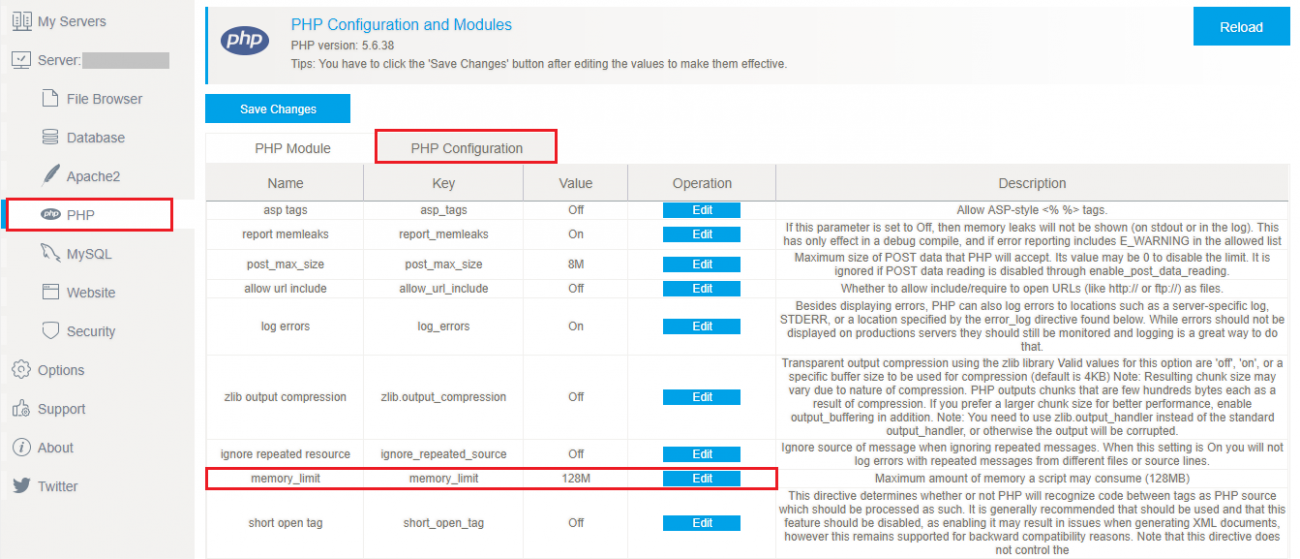
After the installation completed, you sign up and log in VPSrobots. Upon connection to your server, click PHP > PHP configuration > memory_limit. You can find the current value for memory limit.

In above case, we set the PHP memory limit to 128M in our testing environment.
How to increase PHP memory limit in WordPress
Several methods are available to use to increase PHP memory limit. However, we will pick two easiest ways to show you how to increase PHP memory limit in WordPress.
1. Edit PHP configuration with VPSrobots
As I mentioned above, VPSrobots is a quite good control panel for managing Linux web server. Using VPSrobots, you can edit PHP configuration with a little effort.
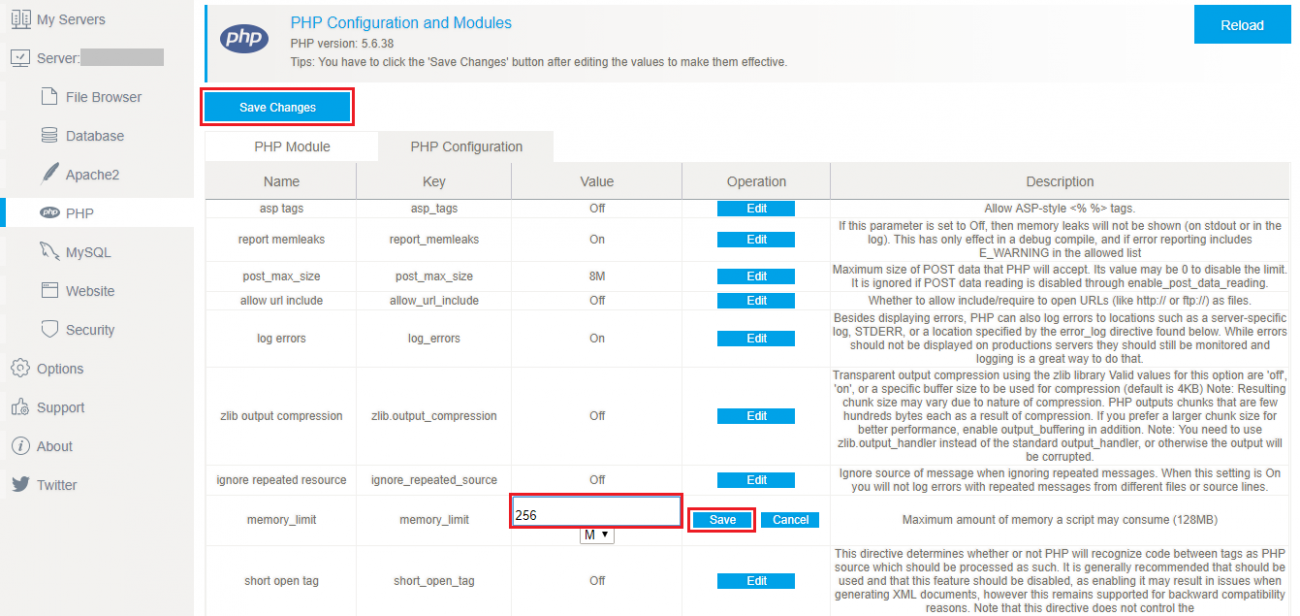
You can modify the value for PHP memory_limit on PHP configuration page.
First, click Edit button, which makes the value is available to edit, and enter the value as 256 MB or 512 MB as you need.
After that, click Save button. Then, click Save Changes button at the upper left corner to take effect.

2. Configure wp-config.php
At first, you need to find wp-config.php file on your WordPress site. It is located in your WordPress site’s root directory.
Using FTP client or VPSrobots which comes with File Browser feature, you need to download wp-config.php file to your computer.
Next, you need paste the code below in wp-config.php file and make sure this code is just before the line says ‘ That’s all, stop editing! Happy blogging.’
define('WP_MEMORY_LIMIT', '256M');
The code will tell WordPress that you set the value of PHP memory limit to 256 MB. However, you can replace 256M with any value as you want.
After adding this code, you need to save changes and upload it back to your server and the new file overwrites the existing one.
Once all done, you can visit your site and will find out that allowed memory size exhausted error is fixed now.
If increase failed, what can I do?
If the both mentioned methods doesn’t work on your WordPress site, plus you are hosting your site on shared hosting, in most cases, the operation to increase memory limit is forbade by your web host.
Some shared hosting providers limit the mamximum memory limit and don’t allow users to change it privately. In this case, you need to contact your host and look for an efficient solution. If they can’t provide you with a satisfied solution, then you can consider to change your web host.
Conclusion
I hope this article helped you solve the allowed memory size exhausted error in WordPress by increasing PHP memory limit. You may also want to see our guide on how to create MySQL databases and users.
0 Comments