Do you want to learn how to create and edit an .htaccess file in WordPress? If you do, then you have come to the right place.
.htaccess file is at the core of any WordPress installation. If you are using Apache web hosting services, then WordPress is going to use .htaccess file. Other servers, including NGINX do not use it.
Before we get started with the actual tutorial on how to create and edit an .htaccess file in WordPress, let’s learn more about it here.
What is .htaccess File?
The .htaccess file is used to configure the Apache web server. It is a WordPress core file and if you want to edit how your site works, then the .htaccess is for you. By using the .htacess file, you can disable or enable certain aspects of your server. For instance, you can use it to create permalinks or do redirects.
Moreover, you can also use the .htaccess file to make your WordPress site more secure. Yes, it lets you secure your site. It stays hidden by default. That’s why before you access it, you need to show the hidden files and then look for it.
However, there can be some instances where the file is not present. This can happen due to the misconfiguration during the setup. That’s why we will also cover the process through which you can create the .htaccess file easily.
Creating an .htaccess File on Your Server
The process of creating the .htaccess file on your server is as below. To do so, you need to follow the steps mentioned below.
1. First, you need to connect to your web server. You can do so in two steps. The first way is to simply log in to your hosting panel and then go to File Manager from there. The other way is to use an FTP clients known as WinSCP to connect to the server remotely.
It is beyond the scope of the tutorial to show you how to connect remotely with FTP software. That’s why we suggest you use the hosting panel to access the file.
2. Once you are in the File Manager, you need to go to the “public_html” folder.
3. From there, you need to create a new file and name it, “.htaccess”. Make sure that you name it correctly and do not forget the dot ahead of the name itself.
4. Inside the new file, you need to copy-paste the code as below.
# BEGIN WordPress
<IfModule mod_rewrite.c>
RewriteEngine On
RewriteBase /
RewriteRule ^index\.php$ - [L]
RewriteCond %{REQUEST_FILENAME} !-f
RewriteCond %{REQUEST_FILENAME} !-d
RewriteRule . /index.php [L]
</IfModule>
# END WordPress
5. Now save the file.
Congratulations! You now have created a working .htaccess file in your WordPress site.
Editing the .htaccess File in WordPress
Now that we have created the file successfully, now lets the ways in which you can edit the file. You can edit the file in four simple ways.
- WordPress plugin such as WP Htaccess Editor
- cPanel
- FTP Client- FileZilla
- Yoast SEO Plugin
Let’s go through each one of them below.
1. Using a Dedicated WordPress Plugin: Htaccess Editor

The first method that we are going to discuss is using Htaccess Editor — a free-to-use plugin.
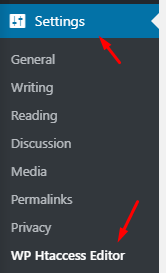
To use the plugin, you need first to download and install it. Once done, you can access it from Settings > WP Htaccess Editor.

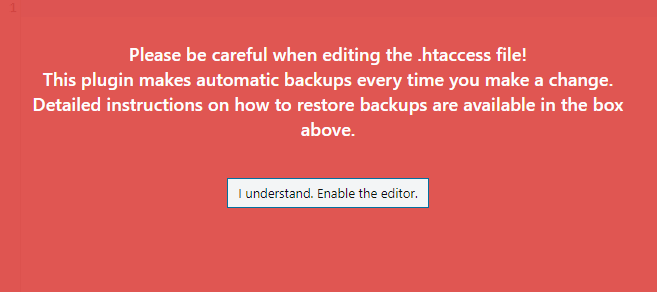
There, you can find the options to edit and modify the .htaccess file. You need to enable the editor to modify the .htaccess file from the plugin.

Also, if you do not have any .htaccess file, it will warn you about its absence as shown in the image below.

It also offers a small guide that you can read before you start editing your file. This is important if you do not know what you are doing.
2. Using the cPanel
The second way is to use cPanel. It is one of the easiest ways to edit the .htaccess file. If you have seen the above process of creating the .htaccess, then you should by now know how to edit them using cPanel. However, to ensure clarity, we will list the steps below.
- Login in to your hosting
- Open cPanel and then File Manager
- Now turn on “show” hidden files.
- Once done, go to the website’s root directory
- There, you will find the .htaccess file in the public_html folder.
- Right-click on the .htaccess file and open it to edit the file.
3. Using the FTP Client – FileZilla
FileZilla is a free-to-use FTP client that lets you remotely connect to the server without the need to access the hosting cPanel.
To use it, you need first to need to create an FTP account from your hosting account. Then, you need to download the FileZilla software and use the credentials to connect to your server remotely. Now, you need to show hidden files and access the “public_html” folder to find the .htaccess file.
4. Using the Yoast SEO Plugin
If you use the Yoast SEO plugin, then you can also edit the .htacess file. All you need to do is go to use the “edit the .htaccess” option in the plugin, and you are good to go! The plugin is an easy method for those who do not want to go through the cPanel or FTP client process.
Conclusion
This leads us to the end of our guide to create and edit an .htaccess file in WordPress. So, what do you think about the tutorial? Do you feel confident in editing your .htaccess file now? Comment below and let us know.
You may also want to see our step by step guide on how to add social login to WordPress site.
0 Comments